Pages

Monday, January 30, 2012

More CHA preview fun...

Hello friends and happy Monday! I hope you all had a great weekend. Mine was a little off...I am trying to fight off the start of a sinus infection. I spent the whole day in bed yesterday. And, as if that wasn't enough, 3 of my 4 kids were sick all last week. Sigh. They are better and I am hoping to be shortly.

I thought since CHA has officially kicked off that I'd share another of my favorite releases. As many of you probably know, my style is very clean and simple. However, I do like to add little pieces of unexpected in my projects be it a distressed edge, some inking or some glitter. Yeah, glitter. :) Tim Holtz never ceases to amaze me with the things he comes up with. I am in awe of his style, even if I cannot seem to muster up the vintage crafter hiding inside me. Tim has teamed up with Ranger yet again with another fabby product...Distress Markers. Oh yes, he did!!

Here's the excerpt from the original press release...

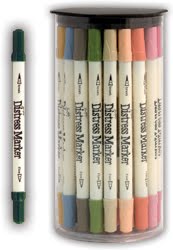
Ranger is thrilled to announce the new Tim Holtz® Distress™ Markers: water-based inks for coloring, journaling, stamping and more. The dual tip markers are ideal for many coloring techniques:
• use the brush tip for coloring, stamping and shading
• use the detail tip for journaling and drawing
• use to color directly on rubber and clear stamps

Distress Markers are available to match the
Distress palette of 36 colors and White Picket
Fence. Coordinates with Distress Inks,
Distress Stains, Distress Crackle Paint, Distress
Stickles™ and Distress Embossing Powders.
Distress Markers will appeal to current
customers who love the Distress palette and
appreciate another art tool to utilize within
that palette. For new customers, markers are
a great way to introduce new crafters to
stamping and scrapbooking that beginners feel
comfortable using right away.

Um, yeah, delish! I am sure you have found some goodies to drain your savings account. hehe What's your favorite so far?

Photobucket

Thursday, January 26, 2012

CHA Previews....

CHA is right around the corner and is my favorite time of year! I love seeing what my favorite manufacturers are releasing and while I'm not attending CHA this time around, I am certainly ready to get my hands on some new goodies.

So, for the next few days I thought it would be fun to share the products I am most excited about. Today I'll start with Simple Stories. I LOVE Simple Stories products. I love the concept behind their product line and while I haven't tried using their products as they intended, I still love working with it in the traditional scrapbooking manner. Simple Stories has released their new Mix & Match 6&8 Album and Page Protectors. They also have coordinating This and That album pages and various sizes of Odds and Ends memorabilia pockets. You can read all about the Mix & Match release and see photos HERE.

Another new release from Simple Stories I am very excited about is the new all boy collection, Awesome. As a mom to 3 boys ranging in age from 6 to 15, this collection would definitely help me get going on my boys' pages. You can read all about Awesome HERE...and even leave a comment for a chance to win the new collection!

So what do you think of the new Simple Stories collections?

Photobucket

Wednesday, January 25, 2012

Playing with new goodies!

One of the things I'm most excited about this CHA is the new Spellbinders M-Bossabilities. If you haven't heard about them, they are double-sided embossing folders and they are available in two sizes. Here are a few intro videos by Spellbinders...


Now, are you as excited about these as I am? Stacey sent some very generous packages full of the NEW Spellbinders CHA releases to our entire design team. I couldn't wait to play so here's a quick and easy Valentine themed card I created with some of my newest goodies...

After making my card base, I cut and embossed the bottom with the *NEW* Classic Edges One and the *NEW* Classic Decorative Inserts One. Next I cut the pink layer, cut out the center with my Heart Nestabilities then embossed it with the *NEW* Imperial M-Bossabilities. After embossing, I inked all over to help the embossing stand out. Before adhering the pink frame with dimensional adhesive I added a bit of Want2Scrap bling to the card base. To finish off the card, I added a seam binding bow and two *NEW* Bitty Blossoms. I added a bit of Distress Stickles and a smidge of glitter.

This card could be easily altered for any occasion...wedding, anniversary and last but not least Valentine's Day.

Scrap-Mart has the new Spellbinders available for pre-order. They always go fast when the shipments arrive so if you want them pre-order them NOW!

Photobucket

Monday, January 23, 2012

Scrap Your Stash: 10 Minute Valentine Tags

If you are anything like me, you have hoards of products hiding in your scrap space and plenty that you have and probably have never touched. With CHA looming in the very near future, now would be a great time to pull out that "old" product and put it to use.

I did just that this weekend. Here are two tags I made to tuck into Cody's and Shelby's lunchboxes on Valentines Day.

I used ONLY product I already had on hand and once I had it all picked out, it only took me 10 minutes to complete the tags. Seriously, 10 minutes. The tags themselves I have had in my stash for at least 4 years. Yes, that long. They had belly bands on them and I removed them. I liked them because they already had the red stitching around them. The rub-ons I received in a package from Making Memories at CHA Winter 2009!! I purchased an embellishment package from Creative Charms in the summer of 2010 and that's where I got the 3-d heart embellishment. The stamps were a more recent acquisition...JustRite's Just Because Mini Sentiments. Next I added some crinkled ribbons and tied them off with some We R Memory Keepers twine. See, super fast and super easy! And my kids will LOVE that they get an extra special treat in their lunches.

So, have at it. Go check out your stash and see what you have that you can use up!

Photobucket

Friday, January 20, 2012

Video: Airbrushing Copics with an Air Compressor

Hello friends and TGIF!! I recently got a new toy, an air compressor, and thought I'd do a video to show you how easy it is to airbrush with Copics and an air compressor.

Check it out:


As I noted in the video, Scrap-Mart has the Windstorm Air Compressor. The Scrap-Mart price is $247.49 and you get free shipping. The ABS3, which contains the air adaptor and air grip is $27.71 and would also ship for free. If you have any questions regarding any of the info I shared in the video or about Copics in general email me at katie@scrap-mart.com and I'd be happy to answer them for you!

Thanks for stoppin' by today! Have a great weekend!

Photobucket

Thursday, January 19, 2012

Sweet Nothin's

Have you seen the new Doily files from Boss Kut? SWOON!! Doilies are super trendy right now and so fun to work with. Here's a sweet Valentine card I made to send to my mom...

I really like making square cards so I made this one 5x5. After adding a few layers of patterned paper I sized and cut the new Heart Doily file. I trimmed a bit off the edge and layered it, adding some crinkled ribbon trim. I thought it needed some sparkle so I covered the doily with some Smooch ink. Next, I colored Sugar 'n Spice Marci with my Copic markers, fussy cut her then adhered her with dimensional adhesive. After stamping the sentiment I thought it needed a bit more so I took a few of the hearts that were leftover from the doily cut and colored them with Copics and Smooch and added one to the bow and one to the sentiment. Tip: Always look at your negatives after cutting...you'd be surprised at how many "usable" pieces you will find!!

Copics used:
skin: R00, R02, E00, E04, W1
hair: YR31, E55, E59
hearts: RV29, R83
clothes: (dress, bow, cupcake top) R81, R83, R85, (shoes) BV23, BV29, (apron and cupcake wrapper) Y21, Y23, Y26, (spoon) E35, E39

Hope you're having a great week!! I'll be back tomorrow with a video sharing how to airbrush with Copics using a compressor. Hope you'll stop by!

Photobucket

Tuesday, January 17, 2012

Hi friends! I hope your week is off to a great start. It's become a pretty hot trend to share your favorite projects from the year before so I thought I'd take a minute to share a few of my favorite projects from 2011 with you. I just chose 5, which was not easy. ;)

We'll start with this...

This was my mom's birthday card. I really loved the fold-out banner and this card was so fun to make.

Next up is...

This was a card I made for a dear friend. Purple is her favorite color and she, like me, is in to zebra print!! I love all the sparkle and bling.

This layout also made it into my top 5 favs...

I really adore the simplicity of this layout. The photo in this layout was taken at my daughter's field trip to the pumpkin patch.

This layout also made it to my favs list...

These pics were from Father's Day last year. We took the youngest two to the lake for the day and had so much fun! This layout was based on a sketch and I really loved how it turned out.

And last, but not least, my 5th favorite project from 2011 was my grand-nephew Dax's mini album...

This project was made for a JustRite challenge and the album "cover" is actually upcycled Spellbinders die packaging. :) I won grand prize with this project...and it was hard to let it go but I did. I hope my niece treasures it.

Well, there you have it, my top 5 favs. I had many more projects I loved but these just took top spot. I love my little hobby and am thankful everyday that I found work (that pays!!) doing something I LOVE to do. My family, while they may not completely understand my passion, supports me and encourages me. I am truly blessed. Thanks to each of you who visit my blog. I appreciate you and your sweet comments. Here's to a fabulous 2012!!

Photobucket

Monday, January 16, 2012

Come crop with me!

Hi friends!! I hope you all had a fabulous weekend! It is unusually warm here today and we are supposed to reach into the 70's!! Um, think I'm gonna have to pull out some flip flops for today! :)

This year is bringing some exciting things for me already! First off, show season has already kicked off!! I went to an Heirloom stamp show in Grapevine, TX January 4th & 5th. Great show and it was nice to see some familiar faces. My next show is the Heirloom stamp show in Lawrenceville, GA next month.

Another exciting thing happening for me is that I have been hired by a local Michael's store (41st & Yale across from Promenade Mall, for my locals) to host crops, teach classes and conduct product demos. Super fun! My first crop is this Friday, January 20th from 3 pm to 9 pm. If you're in the area I hope you can make it. The cost is only $5!!! If you can't make that, I will be demoing the Spellbinders Grand Calibur die cutting machine and Nestabilities die templates on January 28th from 12 to 2 pm. Stop by and say hi!!

I'm off to take my sick daughter to see her ENT, AGAIN!! Four sets of tubes and an adenoidectomy later we are STILL having issues. Sigh. Poor Shelbs. When I told her teacher that she wouldn't be at school today because she wasn't feeling well and had an appointment she responded first to tell Shelby she hopes she feels better soon then, quietly tells me that it won't hurt her to miss today because she is ahead of the entire class anyway. :) So proud of my girl!!! I am contemplating getting her a LeapFrog LeapPad Explorer Touch Pad for her birthday. I would appreciate any feedback if you have experience with them!

Have a GREAT Monday everyone!

Photobucket

Monday, January 9, 2012

Spellbinders Design Team Contest Round 2 Winners Announced!!

Early this morning Spellbinders announced the 26 finalists chosen that will continue on to Round 3 of the design team contest. Here's the official announcement...

After another round has passed and the fantastic level of designs continued to astound us! Because of the difficult decision... the Spellbinders team has decided to pass through 26 participants, rather than 20, to the final round!

This talented group of designers will receive specific dies to use and will be assigned a project in the final round. In addition... they will be required to write an essay about themselves and why they think they'd be a good fit for the Spellbinders Design Team.

The final projects are due February 6th. Those chosen for the Spellbinders Design Team will receive a personal phone call from Spellbinders President, Stacey Caron, on February 13th. The final Design Team list will be posted here, on the Spellbinders blog, after all the chosen designers have been notified. The final Design Team members will be flown to Arizona for a special educational retreat to learn about Spellbinders and to grow as a team!

For a list of the official rules... click here.

And now... the moment we've all been waiting for! Join me in congratulating our third round finalists:


Marisa Job - Santa Clarita, CA
Astrid Maclean - Edinburgh, Scotland
Sylvia Blum - Grenzach-Wyhlen, Germany
Lesley Langdon - Ontario Canada
Michelle Woerner - Aloha, OR
Darsie Bruno - Elmira, NY
Tina McDonald - New Brunswick Canada
Christine Emberson - England
Kim Nath - Valencia, PA
Heidi Van Laar - Trout Lake, WA
Windy Robinson - Loveland, OH
Kathy Roney - Corona, CA
Iwona Palamountain - Australia
Katie Piotrowski - Prue, OK <---------- THAT'S ME!!! Susie Bentz - Centreville, VA Teresa Horner - Covina, CA Shanna Vineyard - Madison, MS Theresa Momber - Redding, CA Debbie Seyer - Arnold, MO Yvonne van de Grijp - Netherlands Ashley Harris - Peoria, AZ Trina McClune - Auckland, New Zealand Tonya Dirk - Portland, OR Judy Hayes - Tracy, MN Angela Ploegman - Bettendorf, IA Monika Martinsen - Sodertalje, Sweden


I can't even begin to tell you how exciting this is for me!! I am beyond THRILLED to have made it this far, among such talented and well-known designers. Spellibinders is sending packages and has assigned us all a specific project and I can't wait to get started on it. I suppose I could work on my essay while I'm awaiting the arrival of the dies. :) Thanks to everyone for the sweet comments and your support! It is greatly appreciated!

Photobucket

Friday, January 6, 2012

Office renovation continues...

So, in late August my hubby decided to renovate our 2 car garage and turn it into my scrapbook room. When the garage was built the walls were insulated. The previous owners had installed a nice, double-hung window and insulated doors and we installed an insulated overhead door when we purchased the home. There were built-ins along the wall and Rocky had filled with with tools and such.

The sheetrock on the walls was actually in good shape, we just used a sander to knock off the dust and rough spaces and shot some texture then painted. It has a concrete floor and in the event that we sell the house or need to get our cars in the garage I opted to go for an epoxy floor coating instead of the hardwood that I really wanted. ;)

So after all the work was done it was time for me to move in. I got money for my birthday and visited Ikea and picked up a large Expedit system. I also purchased a BIG rolling kitchen island from Overstock.com. Earlier this week, Rocky saw some cabinets for sale on Craigslist and went to check them out. Turns out they were custom built a few years ago for a law firm. He bought me 6 of them. Here's what they look like...

These cabinets are solid wood and very sturdy. I am going to span four of them on this wall with a 12 foot workspace and the other 2 will go on the opposite wall for another 6 foot workspace. I intend to use one end of the 12 foot workspace for my sewing set up and the other half will be my personal workspace. The 6 foot area will be my office space where I'll house my files and such. All I need to do is clean them up and pick out my countertops.

Here's a peek at my Expedit shelves all filled up...well, almost filled up :)

And here's a peek at the wall with my Making Memories shelf and kitchen cart...

I still have tons of space left, even with as much as I have in there now.

Well, there you have it...a peek into my studio. I am so thankful to have this space and enjoy every minute in there! I love looking at other people's spaces for ideas so feel free to leave a link to your space in the comment section so I can check out your space too!

Photobucket

Thursday, January 5, 2012

The Smash Book trend

So last year K & Co released the new Smash Book which is a spiral bound book that is used like older style memory books. The ideas is that you don't have to follow the rules behind scrapbooking...like colors, lines and the rule of three's...you just fill your pages and smash the book closed.

I was hired my one of my local Michael's stores to teach classes, assist during crops and conduct product demos. Luckily, I can set my own schedule so I can continue to enjoy my relaxed, work from home lifestyle. ;) Anywho, K & Co. is sponsoring a crop in January and it is called the Smash Bash. Teachers were given a Smash Book to create a store sample and I thought I'd share what I've done so far.

The book comes with a plastic cover on it. If you're careful, you could remove the stickers and keep the cover on to preserve the book.


Since I have to turn this book over to the store when I'm done, I was careful not to put anything in it I couldn't live without. I kept the pages pretty simple and used my Slice to help me work with titles.

If you live in the Tulsa area, the Smash Bash Crop will be on Friday, January 20 from 3-9 pm at the Michael's at 41st & Yale. The cost is only $5!

I'll be back tomorrow with some photos and updates from my office renovation.

Photobucket

Wednesday, January 4, 2012

Sending Love

Today is my first post for the new year for Scrap-Mart! We have a new design team this year and have transitioned our old blog to Facebook! Be sure to find and like Scrap-Mart on Facebook so you can keep up with all the fun! We'll have special coupon codes just for our FB friends, advance notice on sales and perhaps even some prizes along the way!

I know that we are just barely past Christmas but I couldn't wait to start working on some Valentine projects!

I started this card by using the die cutting on the fold technique and my Spellbinders Grand Rectangles. Next I cut and embossed a smaller rectangle layer. Using Spellbinders Classic Scallop and Classic Petal Edgeabilities, I cut and embossed a decorative edge. The edge was covered with some misted seam binding which was tied off in a bow and embellished with some paper flowers. I cut and embossed Spellbinders Scallop Heart Nestabilities and Heart Nestabilities, layered them then topped them off with a button and twine bow. I stamped the sentiment from JustRite's Just Because mini sentiments set then cut and embossed it using the pennant from Spellbinders Lacey Pennants.

To finish it off, I tucked two mini heart pins behind my die cut hearts and added a little xoxo flat back button to the lower right corner. I had lots of fun creating this card and actually used some stuff I've had in my stash for quite some time.

Thanks for stoppin' by today! Join me tomorrow for a peek at my Smashbook!

Photobucket

Tuesday, January 3, 2012

Get Organized Edition: 2012 Planner/Organizer

Hello friends! What a whirlwind the past few weeks have been. With the kids home I have had NO mojo whatsoever. No desire to be in my office. That is VERY unusual for me. I struggled with it and even though I am facing deadlines...like a MAJOR one tomorrow...I just had to let myself NOT create. It was difficult but my kids went back to school today and I am ready to get back to work.

The down time, however, did give me lots of time to think. Every year I create a calendar of sorts for myself. It is a tradition actually started by my friend, Deb (5treasures), who gave me a wonderful handmade calendar a few years ago. I LOVED it and was amazed at how I was able to keep 4 kids, jobs and dr visits all together easily. Each year they get a little more involved.

This year, I am making my calendar into a binder system with a store bought (gasp!) 3 ring binder. I have a few reasons for doing this. I want ONE place where I can keep notes for work things like The Button Farm Club, Scrap-Mart and the design team as well as have a calendar to track my travel schedule. And, since I started creating 8.5x11 layouts, it is a great way for me to keep my favorite layouts where I can see them and they are still protected. Plus, I can easily change them out. ;)

The first thing I'm going to share about my organizer is my calendar pages. I am going to have two types of calendars. A quick reference one that I will make with my Stamps of Life Calendar2Build stamp set and a full-size calendar where I can make notes for each day and have plenty of room. I was going to print off basic google calendars then I saw THIS is my email.

Moneysavingmom.com is one of the coupon and recipe sites I visit often. I am thrilled that she shared this just in time for me to make my calendar.

So there's my step one. I'll be sharing something about my 2012 Planner/Organizer once a week until it's complete. I hope you enjoy it and maybe even find some inspiration to create one for yourself.

Photobucket