Pages

Wednesday, November 30, 2011

Holiday Style layout...

I have had a blast playing with the new Holiday Style collection from October Afternoon. I must confess, I am a BIG OA collector! I LOVE their stuff! So when I opened up the box of goodies they sent us for the blog hop, you can bet I was thrilled! I already shared a quick tag I made and here's the layout...

I know there's no pictures yet, I just couldn't wait to create this layout. The pictures will be mounted on red cardstock and added to the pocket. I started out with the Ring-a-Ling patterned paper. I was really drawn to the grid style of this paper. Next, I tore a wide strip of the Santa Clause Lane b side and adhered it. The pocket was created with the Feliz Navidad paper and I added the 'Nice list' tab from the Word Stickers sheet to the top corner. Then, I wrapped the edge with some twine and added some mini jingle bells. I added the Santa from the Miscellany Pack on one side and a Journaling Card on the other. The journaling card was covered with little word stickers from the Word Sticker sheet. I added a star and circle from the Flower Sack and topped it with a Button, tied off with some twine and jingle bells. After all that was done, I took the snowflake Rub-Ons and added them all over the page. I couldn't resist stringing some pom pom ribbon across the bottom of the pocket.

I have a few more ideas for this collection. It really is fabulous! I hope you'll join us next week for the Scrap-Mart Holiday Blog Hop and see what our design team has done with the collection as well.

Photobucket

Monday, November 28, 2011

Scrap-Mart Holiday Blog Hop

Hello and happy Monday! I hope you all had a fabulous Thanksgiving! I know we did. Are you still eating turkey? We are, reluctantly. But we're almost done.

Did you notice the little blinkie under my blog header?? It is time again for the Scrap-Mart holiday blog hop! The hop will take place beginning Monday, Dec. 5th and will continue through Saturday, Dec. 10th. The following manufacturers are participating...

Boss Kut
October Afternoon
The Rubber Cafe
Canvas Corp
Heartfelt Creations
Want2Scrap
LaLa Land Crafts
Sizzix
JustRite Stampers

Each manufacturer will be giving out prizes along the way as well so there's tons of chances to win some new goodies!! I also have prizes to give out from Spellbinders!! Who wouldn't like some new dies for Christmas?!

I'd like to thank our generous sponsors, Canvas Corp, October Afternoon and Heartfelt Creations. Each of these fabulous companies sent product for our designers to work with and I can't wait to see what everybody comes up with!

The hop will begin next Monday on the Scrap-Mart blog at 9 am! See you there!!

Photobucket

Wednesday, November 23, 2011

Oops,

I was supposed to share my Holiday Style layout today and Rocky and I went to the movies last night so I didn't get my post done. :( Sorry! But, I thoroughly enjoyed watching Breaking Dawn! Can't wait for part 2.

Since I don't have my layout ready for you today, I wanted to share this...

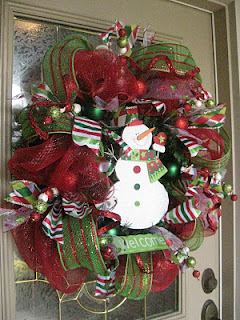
I originally saw this on Pinterest and followed it to Kristen's blog. Isnt't that the cutest darned wreath?! I LOVE snowmen too so this one is really top of my list of favs.

This year, Rocky and I finally bought a full-sized Christmas tree. When we first got together, our place wasn't big enough for a big one so we just used his little bitty one on top of the entertainment center. We always did Christmas at his mom's so we helped put up her tree and all the presents went there...it was only across the yard, after all. But, we've moved and she's moved and now we're kinda on our own. Last year, our first Christmas in the new house, we bought a white 4' tree and pink ornaments. Needless to say, Shelby was thrilled!! LOL! This year, we bought a 7.5' tree with white lights. Then we hand picked a varitey of coordinating ornaments in the bronze/red/gold color scheme. I am super excited because growing up, our tree was very eclectic. Different ornaments collected over the years...some hand crocheted, some glass, some handmade by my brother and I in school. I have always wanted a "themed" tree where everything coordinated. I can't wait for Friday so we can put the tree up. I'll share those pics with you when it's done.

So, back to the wreath. I have decided that I am going to make one of these for our front door. I REALLY want to make a whimsical one like the one Kristen made. Red/white/green and a cutesly little snowman. But, I am really thinking I should make one that coordinates with our tree. I think I have enough ornaments to pull it off so I just need to buy a wreath and get some mesh and picks.

I am prepping for my big day of cooking tomorrow. Cornbread is in the oven, eggs are already hard boiled and I have a bit of work to do for the Scrap-Mart blog hop that's coming up. So, I wish you all a blessed Thanksgiving full of family and love! I will see you sometime later this week!

Photobucket

Tuesday, November 22, 2011

Holiday Style

Have you seen the new Holiday Style collection by October Afternoon?? Swoon!!! I LOVE this collection! October Afternoon sent our entire Scrap-Mart design team the Holiday Style collection to showcase in our upcoming Holiday Blog Hop and I just couldn't wait to play with it. I created this quick and easy gift tag...

First I die cut and embossed the ornament from the City Sidewalks patterned paper using the largest Spellbinders 2011 Heirloom Ornament die template. I cut and embossed the top of the ornament again from silver glitter paper then I used the Spellbinders Triple Scallop Edgeabilities template to cut the decorative edge for the topper on the ornament. Here's a pic of what it looked like after I positioned it...

I simply used a piece of Scotch tape to hold the die in place while I cut it. Next, I cut and embossed the medium sized label from Toyland patterned paper using the Spellbinders Orchard Harvest Tags and Accents die template and topped it with a sticker from the Label Stickers sheet. I couldn't resist adding some of the pom pom trim from the Wrap Pack then topped it off with the candy cane sticker from the 12x12 Shape Stickers sheet. For the hanger, I added a piece of one of the pipe cleaners from the Miscellany pack and simply twisted it closed.

I have actually finished a 12x12 layout with this collection already too...but I haven't added pics yet. I wanted to use it for this year's pictures. I will share it with you tomorrow. :)

You can see the reveal of the Holiday Style collection and some projects from the OA design team HERE.

Photobucket

Monday, November 21, 2011

Fall Fun

Hey friends! I am so excited that THIS Thursday is Thanksgiving!!! My favorite holiday! I can almost smell the turkey cooking! ;)

Today's my day on the Scrap-Mart blog. Here's a peek of my project...

Head over HERE to see the full layout and all the details.

Stop by tomorrow to see a cute project I created using the *new* Holiday Style collection by October Afternoon! LOVE this collection! LOVE it! See ya tomorrow!

Photobucket

Monday, November 7, 2011

Warm Winter Wishes...

The Scrap-Mart design team is preparing for our annual Holiday Blog Hop which will take place the week of Dec. 5-10. I have contacted many of the manufacturers we deal with regularly and invited them to play along with us during that week. Some of the companies have agreed to send our design team product to work with that week as well.

Canvas Corp is one of those companies. If you are not familiar with them, let me tell you that you will LOVE their products. They have their own line of paper as well as tons of embellishments and, as their name suggests, canvases too. Canvas Corp was VERY generous and sent two boxes stuff with goodies for our design team to play with. Oh, and did I mention burlap?! Oh yea! I couldn't wait to dig in and when I saw the pink zebra print skinny cards, I was so happy!! I decided to make a non-traditional winter-themed card with it.

I love the pink/kraft combo! And, I couldn't resist adding a bit of sparkle. After cutting my kraft piece I added 1/4 strips of Scor-Tape along each edge then covered each strip in irridescent glitter. Next, I cut various snowflakes from the Spellbinders 2010 Snowflake collection and the Create-a-Flake Two sets, inked the edges pink and covered them with the glitter. After arranging the snowflakes, I added the ribbon and sprinkled some rhinestones. The sentiment was stamped from PTI's Mailbox Greetings, cut using the ribbon die from the Lacey Pennants set then inke. I added a trio of SU! mini jingle bells and strung all the pieces on some silver cord and tied it around the bow.

Can I tell you how much I LOVE how this card turned out??! It is all of my favorites wrapped into one. I can't thank Canvas Corp enough for their generosity! You will be seeing me use their products LOTS more!

Photobucket

Saturday, November 5, 2011

Give thanks....

Hello friends! Rhinestones are sooooo trendy right now. You can tons in different shapes and sizes and colors everywhere you look. With my Gazelle, I can cut custom rhinestone patters for ANY project with the touch of a button!

For this card, I used the rhinestone tool to create a rhinestone pattern that fit perfectly inside my die cut...

This card is featured on the Scrap-Mart blog today. Hop on over for all the details!

Photobucket

Thursday, November 3, 2011

Sew much fun!!

I am relatively new to sewing. I have tried a few different things and have had some beginner success. My friend's little girl is turning 1 this weekend so I made her a hairbow for her party...

I already had all the ribbon and it worked perfectly because her party theme is cupcakes!! So, when I gave Jennifer the bow she mentioned needing to find an outfit that would match. Um, well, it just so happens that I purchased some fabric at the same time I did the ribbon, with the intention of making a matching set. :) So, I offered to make the birthday dress too. All I needed was a t-shirt to match. Here's a peek at the finished dress...

I made a t-shirt dress with an empire waist and tie back by following THIS tutorial. I love this website. She always has fabulous, easy to follow tutorials. I thought the flowers would be a nice addition. To make them, I cut thin strips from the piece of the shirt that was cut off and twisted and rolled them, hot gluing as I went along. Then, I simply added some pearls to the centers. I cut a circle from felt and glued all three flowers to the felt piece, then glued a safety pin to the back of it. This way, the flowers could be moved to the top like a broach, left on the waistline, added to a headband or removed all together. Here's a closer view of the flowers...

I'm super happy with the way the dress turned out and still have enough fabric left to make Shelby's! Perhaps it will be her birthday dress as well.

Thanks for stoppin' by today! I'll be back Saturday with a warm, Fall inspired card.

Photobucket