

Saturday, December 31, 2011
Happy New Year!!
Hello friends! I just wanted to pop in and wish you all a safe and Happy New Year!! We are celebrating tonight at home with the kids. Please be safe and have fun! I'll see you all next year!

Friday, December 23, 2011
Merry Christmas!!!
Hello friends, this is the last post for me before Christmas! I thought I would share an easy box that you could make quickly for any occasion!
 This box came together really quickly! The front and back were created by simply cutting and embossing two Spellbinders Grand Big Scallop Circles. Then I cut and embossed a regular Spellbinders Grand Circle to fit inside the front panel. The box inside measures 4"x4"x4.25".
 After scoring the box, I simply scored the scallop panels then glued them all together. I used elements from October Afternoon's Holiday Style collection to bring the box together. All edges were inked with Tim Holtz Frayed Burlap Distress Ink. Next, I added a black swirly bling from Want2Scrap and cut and embossed two Heartfelt Creations Spellbinders Holly leaves.
 To finish it off, I added some white seam binding and mini jingle bells tied off with some red twine.
I am tucking an OU cup/mug and Starbuck's giftcard inside for my mother-in-law. I'd like to wish you all a very Merry Christmas! May you be surrounded by family and friends! God bless you all and don't forget the real reason for the season!


I am tucking an OU cup/mug and Starbuck's giftcard inside for my mother-in-law. I'd like to wish you all a very Merry Christmas! May you be surrounded by family and friends! God bless you all and don't forget the real reason for the season!
Monday, December 19, 2011
Did you see this???
Spellbinders has announced the 40 designers that will continue on to round 2 of their 2012 design team contest. Here's the excerpt from the Spellbinders blog...
I cannot even begin to tell you how exciting it is just to make it through the first round! I have about 100 ideas swirling in my head for my round 2 project! I appreciate everyone who has emailed me and left comments! I feel so blessed!
Wow! What a first round it has been! The entries poured in from all over... not just the country... but from all over the world! The amount of talent that was showcased just blows our minds. We had all sorts of entries from cards, to scrapbook layouts, to mixed media projects. Each one of them was unique and truly showed the spirit of the person who created it. Thank you to everyone who participated in round one!
And now... to announce the 40 creative souls moving on to round 2! Congratulations to...
AJ Otto
Angela Fehr
Angela Ploegman
Ashley Harris
Astrid Maclean
Christine Emberson
Darsie Bruno
Debbie Seyer
Giovanna Smith
Heidi Van Laar
Iwona Palamountain
Jamie Cripps
Judy Hayes
Kalyn Kepner
Katarina Damm-Blomberg
Kathy Roney
Katie Piotrowski <--- that's ME!!!
Kendra Sand
Kim Nath
Kimberly Crawford
Latisha Yoast
Lesley Langdon
Linda Lucas
Lisa Fish
Marisa Job
Michelle Woerner
Monika Martinson
Sarah Mullanix
Shanna Vineyard
Stacy Rodriguez
Susie Bentz
Sylvia Blum
Teresa Horner
Terrance Doxie
Theresa Momber
Tina McDonald
Tonya Dirk
Trina McClune
Windy Robinson
Yvonne von de Grijp
The second round of submissions for these 40 people are due by 11:59pm CST on January 4th, 2012. Design submissions should be sent to designteam@spellbinders.us. The second round submissions will narrow it down to 20 people for the third round! We're very excited to see how this unfolds. Good luck to all second round participants!
I cannot even begin to tell you how exciting it is just to make it through the first round! I have about 100 ideas swirling in my head for my round 2 project! I appreciate everyone who has emailed me and left comments! I feel so blessed!
Friday, December 16, 2011
O Christmas Tree...
A few years ago I bought a white 4' pre-lit Christmas tree at a Black Friday sale for $12. I thought it was a pretty good deal. Then, I hit Hobby Lobby and purchased some mini tree pink ornaments, some silver bead garland, a star for the top and a tree skirt. Little did I know at the time that my daughter would think it was the BEST tree in the world!
Shelby spent hours entertaining herself decorating the tree. Now that we have purchased a 7.5' tree we have given Shelby the pink/white one for her bedroom. Talk about one happy little girl! ;) I created this layout with some pics I had taken of her the first time she decorated the tree...
 I started out with a 12x12 Canvas Corp canvas fabric page. LOVE these pages! They are so fun to work with! Before adding anything to the page, I spritzed it a few times with some Peppermint Glimmer Mist. Since i still had plenty of the new October Afternoon Holiday Style collection, I decided to use it for my layout. I chose my pics and Journal Card then cut and embossed a mat with my Spellbinders Grand Calibur and Grand Labels Twenty-Three die template. Then I arranged my pieces and added the ribbon trim below them. The embellishment cluster above the photos was created with pieces from the Miscellany Pack, Flower Sack, Work Stickers and Label Stickers. Next, I decided to make a little candy cane by wrapping some twine around on of the pipe cleaners from the Miscellany Pack.
This layout was based on the 12x12 sketch in this post and I really wanted to keep the banner in the design. So, I took some of the twine and strung it across my page then started adding embellishments. I used pieces from the Flower Sack, Buttons, Word Stickers, Label Stickers and even die cut some of my pieces using my Spellbinders Nested Pennants die templates. Here's a close-up view of the banner...
 I just LOVE how it all came together!
I hope you all have a wonderful weekend!
Shelby spent hours entertaining herself decorating the tree. Now that we have purchased a 7.5' tree we have given Shelby the pink/white one for her bedroom. Talk about one happy little girl! ;) I created this layout with some pics I had taken of her the first time she decorated the tree...
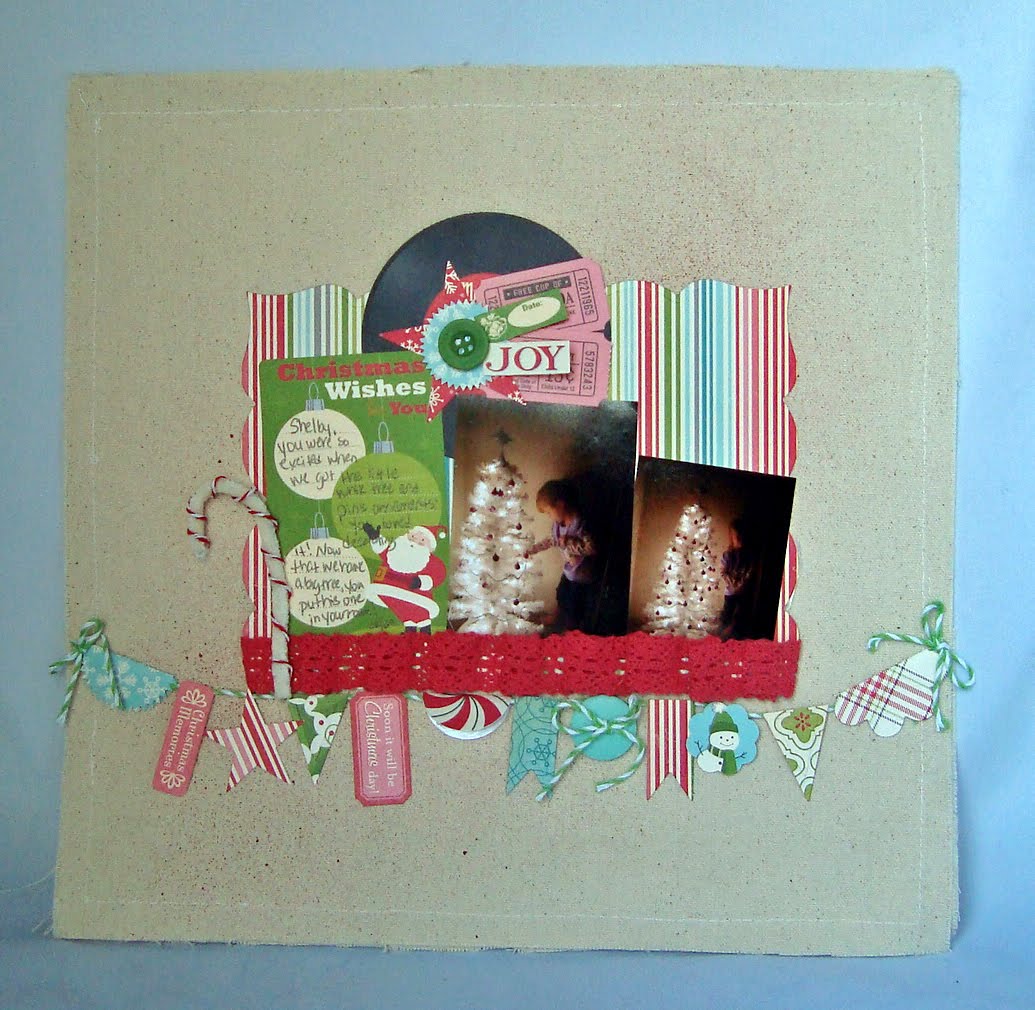
This layout was based on the 12x12 sketch in this post and I really wanted to keep the banner in the design. So, I took some of the twine and strung it across my page then started adding embellishments. I used pieces from the Flower Sack, Buttons, Word Stickers, Label Stickers and even die cut some of my pieces using my Spellbinders Nested Pennants die templates. Here's a close-up view of the banner...

I hope you all have a wonderful weekend!
Thursday, December 15, 2011

Wednesday, December 14, 2011
Personalized Home Decor
Do you Pinterest? It is my newest addiction. ;) There's so much to see there...I can get lost there for hours. Lately, I've seen a lot of framed home decor projects and I decided to make one like I had seen on Pinterest before.
We are working, room by room, to personalize our home and make it ours. The foyer is our next project. We will be adding some family photos and I thought a monogrammed frame would be the perfect item to bring our photo collage together.
 Glass etching may sound daunting but trust me, it really is easy! And your Gazelle does all, well almost all, of the work for you! I set my project size to the size of the glass insert for the frame, 8x10. Then, I chose my font and entered my text for the monogram and centered it where I wanted it. Then, I chose a second script font and entered the 'est.' and year and adjusted it's placement. Be sure you are using a vinyl blade when working with the vinyl. You don't want jagged edges or tears...especially when using it for glass etching. After changing out my blade, I loaded my vinyl on my mat and cut it out. So easy! It doesn't matter what color vinyl you choose because you're just using it as a tool this time. Scraps work great for this type of project. After cutting the vinyl, I had to "weed" out the parts I didn't need. In this case, I wanted the negative so I weeded out the actual letters. Here's what it looked like when I was done...
 The next step is to get the vinyl onto my glass. The easiest way to accomplish this is to use transfer paper. When you're adhering the transfer paper to your vinyl, be sure you are burnishing it good all the way around so you don't have any bubbles or gaps. Then gently pull the transfer paper toward you, starting from the farthest corner, ensuring you're getting all the vinyl as you go. Here's what it should look like...
 Now you're ready to apply the vinyl to the glass. Now, I cut my vinyl piece to 8x10 as well so I wouldn't have to worry about centering it on the glass. So I started by setting the vinyl along the very top edge of the glass, making sure my corners matched up perfectly. As I laid the vinyl, I burnished it as I went, like using a squeegee on your car windows then carefully removed the transfer paper, ensuring I didn't pick up any of the small pieces that fill my letters. I applied the Etch All Cream according to the directions on the bottle, waited about 15 or so minutes, rinsed and removed the vinyl. That's it!!
This would be a great project for a childs room, a perfect wedding gift or an easy accent for your own home decor!
We are working, room by room, to personalize our home and make it ours. The foyer is our next project. We will be adding some family photos and I thought a monogrammed frame would be the perfect item to bring our photo collage together.


This would be a great project for a childs room, a perfect wedding gift or an easy accent for your own home decor!
Tuesday, December 13, 2011
Burnished Velvet Snowman Tag
I don't know about you but I LOVE glitter! A little sparkle on a project can make a big difference! Are you familiar with the Burnished Velvet technique? Terri with Boss Kut has done a series of videos that tell you what you'll need and just how to do it. You can view them HERE in Terri's YouTube channel.
Here's a fun little snowman tag I made for Boss Kut for the blog hop last week using this technique...
 I chose to work with the new Melting Snowman Tag. After I opened the file in Funtime, I simply pulled the "arms" off (cause I wanted them as a layer, not cut as part of the design) and changed the line colors so the pieces could all be cut separately without disassembling the shape. I added my adhesive to my cardstock and loaded my mat. Be sure you do test cuts, as Terri suggests in the video. You don't want to wast a bunch of your adhesive, or time! I cut the inside pieces on Pressure 1 then cut the outside on the highest pressure. That was it!
So after I got it cut it was time to glitter! I used my paper piercer to "weed" the pieces...just like you would a garden, you remove the cover to expose the area you want to work on. I glittered one color at a time...the hat band, the nose then all my black pieces. After I applied each section of giltter, I pulled out my Copic to color the sections. Yes, you read that right! I colored the glitter with my Copics! The hat band was colored with R29, the nose YR18 and the rest with 100 Black. Super easy! Here's a pic of what the process looks like...
 So fun! After I was done coloring, I cut the charm mat (included in the file) and the arms and finished assembling the tag. I added some Canvas Corp Cord to the top and tied it to a gift bag. Here's a closer view of the tag so you can see all the sparkle and shine...
 Isn't he cute?! I had a lot of fun with this technique and will definitely be trying it again in the future!
Here's a fun little snowman tag I made for Boss Kut for the blog hop last week using this technique...

So after I got it cut it was time to glitter! I used my paper piercer to "weed" the pieces...just like you would a garden, you remove the cover to expose the area you want to work on. I glittered one color at a time...the hat band, the nose then all my black pieces. After I applied each section of giltter, I pulled out my Copic to color the sections. Yes, you read that right! I colored the glitter with my Copics! The hat band was colored with R29, the nose YR18 and the rest with 100 Black. Super easy! Here's a pic of what the process looks like...


Monday, December 12, 2011
Snow much Fun!!
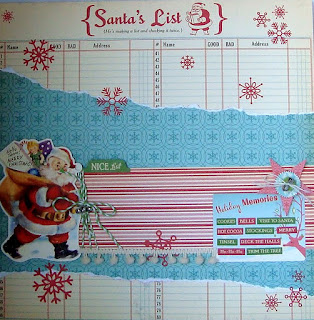
Hello friends! I hope you all had a fabulous weekend! You know, last year in the Midwest we got slammed with TONS of snow! And I mean T.O.N.S.! The sketch I shared with you last week with the little snowman was just what I needed for some of the photos I took of my kids playing in the snow last year.
 As you can see I followed the sketch all the way. I just really liked all the aspects of it. All items used on this layout are from the October Afternoon Holiday Style collection.
Thanks for stopping by today! I hope your Monday is the start of a fabulous week!

Thanks for stopping by today! I hope your Monday is the start of a fabulous week!
Friday, December 9, 2011
Happy Birthday Mom!
Today is my mom's 70th birthday! I live in OK and she lives in MS. I really miss her, especially on days like today. Oh how I wish she were here with me! Since she's not, I sent her a handmade card and a spoon I for her spoon collection. I try to grab her one from the airports when I travel. Not much, but at least she knows I'm thinking of her.
I wanted to do something fun and different for her card this year so I grabbed my Spellbinders Hexagon Petal Envelope die templates and went to work.
 The outside is pretty simple. I cut and embossed then added some colored "dots" by stenciling my Pink Copic Spica Glitter Pen while the paper was still in the die. Next, I folded it up and created a belly band by cutting a 4"x2" strip of paper. I cut the decorative edges using Spellbinders Classic Petal Edgeabilities and added some crinkled seam binding to tie it closed. Using the flowers in the die template set, I created a multi-layer flower and topped it off with some Prima Gems. For the sentiment, I stamped the "happy birthday" from JustRite Stampers Just Ducky Cling set then cut and embossed it with the banner from Spellbinders Nested Lacey Pennants die template set. Here's what it looks like when you remove the ribbon and open it up...
 I used October Afternoons Sidewalks 8x8 Paper pad and these sheets are single sided so I cut another Hexagon Petal Envelope and glued it inside my other so I'd have a patterned paper inside too. This is what it looks like all opened up...
 I cut a layer for the inside so I could handwrite a note using Spellbinders Labels One die template, embossed and inked the edges then added some pink Want2Scrap Labels One Nestabling. For the banner, I cut six of the smallest Spellbinders Nested Pennants twice, one from plain cardstock and one from patterned paper. I layered some pink We R Memory Keepers Twine between the layers then punched a hole on either side of the envelope with my Crop-a-Dile and tucked the twine ends through the holes. This way, when the envelope is opened up, the banner pulls out! LOVE IT!
 To spice it up a bit, I added some clear bling across the top of each banner piece. For the rest of the sentiment, I added alpha stickers from the Simple Stories Life Documented collection kit. This card was super fun to make and I can't wait to hear from my mom after she opens it!
Tomorrow is the last day of the Scrap-Mart Holiday Blog Hop! Be sure you visit the Scrap-Mart Blog to find out how you could enter to win some fabulous prizes like an autographed Tim Holtz Vagabond machine, a Boss Kut Gazelle digital die cutter or a $500 Spellbinders Bundle!!
I wanted to do something fun and different for her card this year so I grabbed my Spellbinders Hexagon Petal Envelope die templates and went to work.


Tomorrow is the last day of the Scrap-Mart Holiday Blog Hop! Be sure you visit the Scrap-Mart Blog to find out how you could enter to win some fabulous prizes like an autographed Tim Holtz Vagabond machine, a Boss Kut Gazelle digital die cutter or a $500 Spellbinders Bundle!!
Thursday, December 8, 2011
Thursday Sketch Inspiration
The December Page Maps are up so I went browsing. This one caught my eye because of the little snowman.
 We got TONS of snow here in NE Oklahoma last year and I have plenty of pics to prove it! I also have a cute little die cut sticker from the new OA Holiday Style collection that will work perfectly!
And for my 12x12 friends, here's one that I liked a lot...
 This one called to me for the simple fact that I could easily use up some of those scraps I've been hoarding. :)
What do you think?! I'd love for you to share a link if you create with either of these sketches.

And for my 12x12 friends, here's one that I liked a lot...

What do you think?! I'd love for you to share a link if you create with either of these sketches.
Wednesday, December 7, 2011
Today's my day...
on the Scrap-Mart blog! We're on day 3 of the blog hop. Are you following it? There's tons of great inspiration and each of the manufacturers have some fun prizes up for grabs!
Tuesday, December 6, 2011
Stocking Gift Card Boxes
My two oldest are getting to where they want money and gift cards for Christmas. As a mommy, I sometimes struggle with this because I feel like I should find them something great, just for them, that they’ll enjoy. But, this year, I figured if that’s what they want that’s what I should give them. I CAN personalize the packaging though, which makes me feel a little better.
I picked them each up an iTunes gift card. The cards are taller than regular credit card sized gift cards so a simple gift card envelope wouldn’t work. I decided to make them little gift card boxes (which were featured on the Boss Kut blog yesterday)…
 My Gazelle, of course, was my go to tool for this project! I used the Holly Stocking, enlarged it to the size I needed, duplicated the shape then mirrored one of them. That way I have a front and a back. After cutting the stocking pieces, I created a spine by simply cutting an 8.5″ x 2″ strip of cardstock and scoring 1/2″ on either long side. Then all I had to do was snip little “v’s” so that the strip would bend without cracking. I glued the strip to both stocking pieces and added the tops. To personalize them, I cut a monogram letter and little hollys from the Holly Stocking and added them to a burlap heart. I am thinking I *might* be able to reuse the boxes (if my kids don’t destroy them) so instead of gluing the hearts on, I used a mini clothes pin to pin the hearts to the boxes. Then, I added a bit of cord to the spine of the box to create a little hanger. The burlap heart, mini clothes pin and cord are products from Canvas Corp. Here’s a pic of the inside of the box…
 So I can add the gift cards and tuck a little tissue paper in there and I’m good to go. These were super easy to create and you could have them whipped up in no time! This design is also great for assembly line projects so if you have more than one you need, you can do all your cutting first then assemble!
Don't forget today is day two of the Scrap-Mart Holiday Blog Hop. Lots of inspiration and some AMAZING prizes!!!
I picked them each up an iTunes gift card. The cards are taller than regular credit card sized gift cards so a simple gift card envelope wouldn’t work. I decided to make them little gift card boxes (which were featured on the Boss Kut blog yesterday)…


Don't forget today is day two of the Scrap-Mart Holiday Blog Hop. Lots of inspiration and some AMAZING prizes!!!
Monday, December 5, 2011
Let the hoppin' begin!
Good Monday morning! Today is the first day of the Scrap-Mart holiday blog hop! Scrap-Mart has teamed up with these fabulous manufacturers to bring you a week long blog hop dedicated to Christmas-themed projects!
Boss Kut
October Afternoon
The Rubber Cafe
Canvas Corp
Heartfelt Creations (Dec. 7th)
Want2Scrap
LaLa Land Crafts
Sizzix
Each of the generous manufacturers will have prizes for you along the way, so be sure visit and complete the hop each day from today (December 5) through December 10 to be eligible to win.
Scrap-Mart is giving away an autographed Tim Holtz Vagabond die cutting machine, Boss Kut Gazelle digital die cutter AND a $500 Spellbinders Bundle!!! To be eligible to win, you MUST like/fan us on Facebook AND follow the giveaway link on the left side of our page. The Gazelle was generously donated by Boss Kut. To be eligible to win the Gazelle, you must also like Bosskut on Facebook! Winners will be chosen from those who sign up through the Facebook Giveaway page...not by blog comments!
Click HERE to begin the hop! Mindy and Gini have some fabulous projects and inspiration to share with you!
Friday, December 2, 2011
Oh Christmas tree...
Hello and TGIF!!! Have you played with Flower Soft? It is a fun embellishment to add to your projects. It adds great texture and is really fun to work with.
With the Christmas season upon us I thought I'd share with you a fun way to use Flower Soft. Use it to "make" a Christmas tree element for your projects!! Check it out..
 Cute, eh?! This is a super easy process to do. Simply die cut your tree...I used my Slice but any die cut will work. Next, I covered the tree with adhesive pearls as "ornaments". Then I covered all the area with Flower Soft Glue then sprinkled my Flower Soft all over, pressing it slightly as I went along. Allow it to dry and that's it! Here's a side view so you can see the texture...
 A super easy embellishment for any project.
Thanks for stopping by today! I hope you all have a fabulous weekend!
With the Christmas season upon us I thought I'd share with you a fun way to use Flower Soft. Use it to "make" a Christmas tree element for your projects!! Check it out..


Thanks for stopping by today! I hope you all have a fabulous weekend!
Thursday, December 1, 2011
Thursday Sketch Inspiration
Wow, Thursday already?! Where has this week gone?! I have been super busy preparing for the Scrap-Mart Holiday Blog Hop next week! Not only will I be sharing projects for Scrap-Mart, but I have also created 3 projects for Boss Kut!
In between projects and drying time, I was perusing Page Maps for some new sketches to work with. I LOVE working from sketches. Sometimes I draw my own and sometimes I find them online. Here is one I'll be working with shortly...
 And this one is just screaming for some October Afternoon Holiday Style. Don't you think???
 Christmas pennants, um, yes please!
I hope you're having a great week! Another hour or so in my office then I'm off for some grocery shopping! See ya soon!
In between projects and drying time, I was perusing Page Maps for some new sketches to work with. I LOVE working from sketches. Sometimes I draw my own and sometimes I find them online. Here is one I'll be working with shortly...


I hope you're having a great week! Another hour or so in my office then I'm off for some grocery shopping! See ya soon!
Wednesday, November 30, 2011
Holiday Style layout...
I have had a blast playing with the new Holiday Style collection from October Afternoon. I must confess, I am a BIG OA collector! I LOVE their stuff! So when I opened up the box of goodies they sent us for the blog hop, you can bet I was thrilled! I already shared a quick tag I made and here's the layout...
 I know there's no pictures yet, I just couldn't wait to create this layout. The pictures will be mounted on red cardstock and added to the pocket. I started out with the Ring-a-Ling patterned paper. I was really drawn to the grid style of this paper. Next, I tore a wide strip of the Santa Clause Lane b side and adhered it. The pocket was created with the Feliz Navidad paper and I added the 'Nice list' tab from the Word Stickers sheet to the top corner. Then, I wrapped the edge with some twine and added some mini jingle bells. I added the Santa from the Miscellany Pack on one side and a Journaling Card on the other. The journaling card was covered with little word stickers from the Word Sticker sheet. I added a star and circle from the Flower Sack and topped it with a Button, tied off with some twine and jingle bells. After all that was done, I took the snowflake Rub-Ons and added them all over the page. I couldn't resist stringing some pom pom ribbon across the bottom of the pocket.
I have a few more ideas for this collection. It really is fabulous! I hope you'll join us next week for the Scrap-Mart Holiday Blog Hop and see what our design team has done with the collection as well.

I have a few more ideas for this collection. It really is fabulous! I hope you'll join us next week for the Scrap-Mart Holiday Blog Hop and see what our design team has done with the collection as well.
Monday, November 28, 2011
Scrap-Mart Holiday Blog Hop
Hello and happy Monday! I hope you all had a fabulous Thanksgiving! I know we did. Are you still eating turkey? We are, reluctantly. But we're almost done.
Did you notice the little blinkie under my blog header?? It is time again for the Scrap-Mart holiday blog hop! The hop will take place beginning Monday, Dec. 5th and will continue through Saturday, Dec. 10th. The following manufacturers are participating...
Boss Kut
October Afternoon
The Rubber Cafe
Canvas Corp
Heartfelt Creations
Want2Scrap
LaLa Land Crafts
Sizzix
JustRite Stampers
Each manufacturer will be giving out prizes along the way as well so there's tons of chances to win some new goodies!! I also have prizes to give out from Spellbinders!! Who wouldn't like some new dies for Christmas?!
I'd like to thank our generous sponsors, Canvas Corp, October Afternoon and Heartfelt Creations. Each of these fabulous companies sent product for our designers to work with and I can't wait to see what everybody comes up with!
The hop will begin next Monday on the Scrap-Mart blog at 9 am! See you there!!
Wednesday, November 23, 2011
Oops,
I was supposed to share my Holiday Style layout today and Rocky and I went to the movies last night so I didn't get my post done. :( Sorry! But, I thoroughly enjoyed watching Breaking Dawn! Can't wait for part 2.
Since I don't have my layout ready for you today, I wanted to share this...
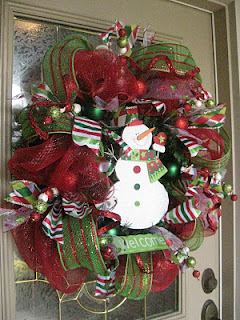 I originally saw this on Pinterest and followed it to Kristen's blog. Isnt't that the cutest darned wreath?! I LOVE snowmen too so this one is really top of my list of favs.
This year, Rocky and I finally bought a full-sized Christmas tree. When we first got together, our place wasn't big enough for a big one so we just used his little bitty one on top of the entertainment center. We always did Christmas at his mom's so we helped put up her tree and all the presents went there...it was only across the yard, after all. But, we've moved and she's moved and now we're kinda on our own. Last year, our first Christmas in the new house, we bought a white 4' tree and pink ornaments. Needless to say, Shelby was thrilled!! LOL! This year, we bought a 7.5' tree with white lights. Then we hand picked a varitey of coordinating ornaments in the bronze/red/gold color scheme. I am super excited because growing up, our tree was very eclectic. Different ornaments collected over the years...some hand crocheted, some glass, some handmade by my brother and I in school. I have always wanted a "themed" tree where everything coordinated. I can't wait for Friday so we can put the tree up. I'll share those pics with you when it's done.
So, back to the wreath. I have decided that I am going to make one of these for our front door. I REALLY want to make a whimsical one like the one Kristen made. Red/white/green and a cutesly little snowman. But, I am really thinking I should make one that coordinates with our tree. I think I have enough ornaments to pull it off so I just need to buy a wreath and get some mesh and picks.
I am prepping for my big day of cooking tomorrow. Cornbread is in the oven, eggs are already hard boiled and I have a bit of work to do for the Scrap-Mart blog hop that's coming up. So, I wish you all a blessed Thanksgiving full of family and love! I will see you sometime later this week!
Since I don't have my layout ready for you today, I wanted to share this...
This year, Rocky and I finally bought a full-sized Christmas tree. When we first got together, our place wasn't big enough for a big one so we just used his little bitty one on top of the entertainment center. We always did Christmas at his mom's so we helped put up her tree and all the presents went there...it was only across the yard, after all. But, we've moved and she's moved and now we're kinda on our own. Last year, our first Christmas in the new house, we bought a white 4' tree and pink ornaments. Needless to say, Shelby was thrilled!! LOL! This year, we bought a 7.5' tree with white lights. Then we hand picked a varitey of coordinating ornaments in the bronze/red/gold color scheme. I am super excited because growing up, our tree was very eclectic. Different ornaments collected over the years...some hand crocheted, some glass, some handmade by my brother and I in school. I have always wanted a "themed" tree where everything coordinated. I can't wait for Friday so we can put the tree up. I'll share those pics with you when it's done.
So, back to the wreath. I have decided that I am going to make one of these for our front door. I REALLY want to make a whimsical one like the one Kristen made. Red/white/green and a cutesly little snowman. But, I am really thinking I should make one that coordinates with our tree. I think I have enough ornaments to pull it off so I just need to buy a wreath and get some mesh and picks.
I am prepping for my big day of cooking tomorrow. Cornbread is in the oven, eggs are already hard boiled and I have a bit of work to do for the Scrap-Mart blog hop that's coming up. So, I wish you all a blessed Thanksgiving full of family and love! I will see you sometime later this week!
Tuesday, November 22, 2011
Holiday Style
Have you seen the new Holiday Style collection by October Afternoon?? Swoon!!! I LOVE this collection! October Afternoon sent our entire Scrap-Mart design team the Holiday Style collection to showcase in our upcoming Holiday Blog Hop and I just couldn't wait to play with it. I created this quick and easy gift tag...
 First I die cut and embossed the ornament from the City Sidewalks patterned paper using the largest Spellbinders 2011 Heirloom Ornament die template. I cut and embossed the top of the ornament again from silver glitter paper then I used the Spellbinders Triple Scallop Edgeabilities template to cut the decorative edge for the topper on the ornament. Here's a pic of what it looked like after I positioned it...
 I simply used a piece of Scotch tape to hold the die in place while I cut it. Next, I cut and embossed the medium sized label from Toyland patterned paper using the Spellbinders Orchard Harvest Tags and Accents die template and topped it with a sticker from the Label Stickers sheet. I couldn't resist adding some of the pom pom trim from the Wrap Pack then topped it off with the candy cane sticker from the 12x12 Shape Stickers sheet. For the hanger, I added a piece of one of the pipe cleaners from the Miscellany pack and simply twisted it closed.
I have actually finished a 12x12 layout with this collection already too...but I haven't added pics yet. I wanted to use it for this year's pictures. I will share it with you tomorrow. :)
You can see the reveal of the Holiday Style collection and some projects from the OA design team HERE.


I have actually finished a 12x12 layout with this collection already too...but I haven't added pics yet. I wanted to use it for this year's pictures. I will share it with you tomorrow. :)
You can see the reveal of the Holiday Style collection and some projects from the OA design team HERE.
Monday, November 21, 2011
Fall Fun
Hey friends! I am so excited that THIS Thursday is Thanksgiving!!! My favorite holiday! I can almost smell the turkey cooking! ;)
Today's my day on the Scrap-Mart blog. Here's a peek of my project...
 Head over HERE to see the full layout and all the details.
Stop by tomorrow to see a cute project I created using the *new* Holiday Style collection by October Afternoon! LOVE this collection! LOVE it! See ya tomorrow!
Today's my day on the Scrap-Mart blog. Here's a peek of my project...

Stop by tomorrow to see a cute project I created using the *new* Holiday Style collection by October Afternoon! LOVE this collection! LOVE it! See ya tomorrow!
Subscribe to:
Posts (Atom)