Pages

Wednesday, December 12, 2012

Gift ideas Day 3

I think I mentioned my new love of jewelry making back in the summer after I had tried my hand at making some neckalces for my mom. Well, it has turned into not only another hobby for me but a business, believe it or not. Here is a matching set I made recently for an order...
Jewelry supplies are readily available not only in big box stores but also online in many places as well. I order some of my supplies from Craft Fantastic, which I actually found at the scrapbook shows I work. ;) Etsy is also a great source for beading and jewelry supplies. My favorite glue to use is Diamond Glaze by Judikins. Fast drying and water based so it cleans up easily. You could order your supplies in bulk (qtys of 10 or so) and make personalized gifts for your family, co-workers, etc. for as little as $3-5 per person. And you can use scrapbook paper or images you print from the internet or even fabric pieces to complete your jewelry pieces. Visit my etsy store: HandmadebycreativeK8 Photobucket

Monday, December 10, 2012

Gift ideas Day 2

Happy Monday! I am back today with another great gift idea. And the best part is that this gift is VERY inexpensive! I mean, could be as little as $1, if you already have the vinyl on hand like I did. So, let's get to it. What is today's idea you ask? Well, customized/personalized water bottles. :)
You can pick up these aluminum water bottles just about anywhere, including the Dollar Store! A friend of mine snagged up some in our school colors and I added Rockets and the player's numbers to them using vinyl. Her hubby coaches the team and they are going to be the player's gifts. Cute eh? And check this one out...
College rivalry is B.I.G. here in OK, and I am sure it is in every state. So I dolled up a silver water bottle for the OSU Cowboys fans. A die cut machine, some vinyl and a $1 water bottle from the dollar store and you have yourself a super easy, and super inexpensive yet thoughtful gift. You could even add some fabric or ribbon strips to the top or maybe a personalized keychain. So many possibilities! Photobucket

Saturday, December 8, 2012

'Tis the season...

Gosh, I can't believe December is already here. What a year 2012 has been. Christmas will be here before you know it so I thought I would take the next few days to share some gift giving ideas. First up is glass etched baking dishes. It may sound difficult, but this is actually a fairly simple projcet. And, if you have a die cut machine, this project is even easier.
Sorry the pics aren't the best. These were for an order and by the time I was done, my natural light was g.o.n.e. But, you can still see the images in the bottom of the dishes. I searched online until I found the images I wanted them imported them into my Funtime software. After vectorizing the jpeg's I sized them then mirrorred the image and cut it from vinyl. I had to "weed" the vinyl, taking away the actual die cut because you want the "negative" for this particular project. Then I used transfer tape to move the vinyl to the dish. I spent about 10 minutes centering and placing the image then burnishing the vinyl WELL to make sure there were no bubbles where the cream could get under the vinyl. Then, I applied the cream and waited. The whole process, start to finish, took about 45 minutes per dish. That includes searching for the images, the whole nine yards. Not too bad really. If you are looking for some fun ideas, do a search on pinterest for glass etching. Cute stuff! Photobucket

Wednesday, September 12, 2012

A Trio of Tags

I recently hosted a Premiere Jewelry party and some of my friends from the scrapbook show circuit I work ordered some new bling. Their stuff came to me and I mailed it out to them but thought it would be fun to include a little handmade tag for each of them. After all, it is this wonderful craft that brought us together as friends. :)
I tried to incorporate a bit of myself into each tag, while making it special for the recipient too. Here's a closer view of each of them...
This little tag was created for LeeAnn. I don't know her that well, but I have seen her around a lot. She is always smiling, willing to help with anything and is warm and sweet. I handcut the tag background from a 6x6 American Crafts paper pad. Next, I grabbed a stamp set I got from ScrapAce a while back and stamped the sentiment then heat embossed it with neon pink embossing powder! YUM! Using my iRock, another ScrapAce deal!, I attached the little green embellies. The tag is topped off with some crinkled ribbon and We R Memory Keepers twine.
This tag is for my friend Teresa. I met Teresa years ago right here in Tulsa when I was selling cars. I sold her hubby a pickup truck and he brought her back to buy an SUV. We became good friends then she was transferred with her job. I hadn't seen or heard from her in years then one day, we ran into each other at a scrapbook show in Bellvue, WA. She lives near there now and travels the circuit with Craft Fantastic. The pink in this card is definitely me. Teresa likes vintage inspired crafts so I pulled the doily in for her, but the tag overall has a very CAS feel. I used one of Becca Feeken's new stamp sets for my sentiment. Again this one is topped off with some crinkled ribbons.
And last but not least, this little tag was created for my very special friend, Michelle Ogdahl, owner of Avocado Arts stamps. I have known Michelle for years...she used to be our rep when she worked in the industry before opening Avocado Arts. She is a doll. The sweetest thing you could imagine. Of course, I HAD to use Avocado Arts stamps on her tag. ;) This is the January 2012 set. I created the tag with some Canvas Corp fluted cardstock, misted it with some Strawberry Shortcake Glimmer Mist then layered up some Want2Scrap bling and the stamped banner and sentiment. I had fun making these little tags and I hope they put a smile on my friends' faces when they open their packages! Photobucket
Tuesday, September 11, 2012

Happy Birthday

One of the best things about my job is shopping in the booth. Of course, this is also one of the most dangerous too because I could easily spend my whole paycheck there! lol! Last month, I went to a show and we had the big booth, which I hadn't seen in a while. I was thrilled to see we still had some October Afternoon Cakewalk. I snagged up the whole collection and couldn't wait to play! Shelby had a birthday party to go to this weekend so I grabbed my Cakewalk and went to work!
I had some American Crafts notecards so I grabbed one of those and trimmed the bottom off so that it would resemble a little banner. Then I layered up some papers and embellies. Here's a closeup of the card...
I just love October Afternoon! You can find their collections in the Scrap-Mart booth at a scrapbook show near you! Photobucket

Monday, September 10, 2012

Bling Bling!

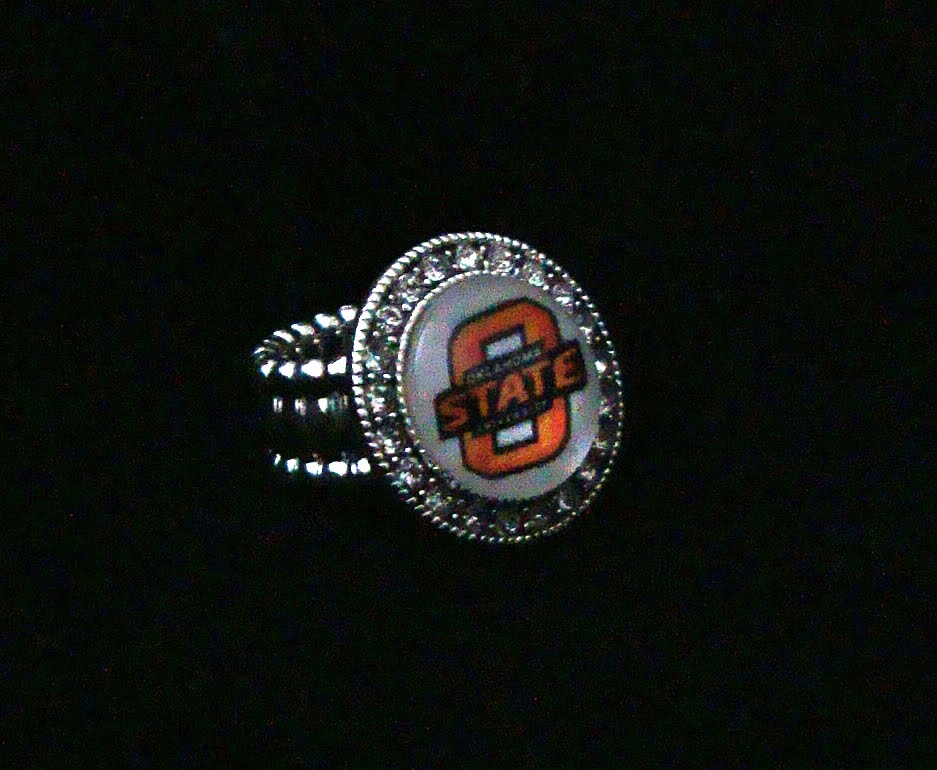
Hello friends! I have been super busy the last few weeks. Lots going on around here. I opened an Esty shop where I will sell some of my jewelry creations. I also decided to open my studio to crops, classes and private parties. You can read more about that on my K8's Classroom blog. I found some great ring blanks with rhinestone bezels and thought they'd be the perfect addition to my etsy shop! Check 'em out...
I posted them on my Facebook page and had orders right away! I can do them in ANY theme, color, and for any school!! And they are only $10 so if you'd like one, you can email me at handmadebyK8@gmail.com or order one through my etsy shop! I'll be back tomorrow to share a fun birthday card! Photobucket

Wednesday, August 22, 2012

JustRite Friday Challenge #079 - "Opposites Attract"

This week's challenge over at the JustRite blog is to use the color wheel and create a project using opposite, or complimentary, colors. I have to admit that I originally intended to skip this week. I wasn't immediately inspired. But then I played with my FarmHouse Paper Company Sugar Hill collection. And revisited the JustRite blog post. Then, I came up with this...
I started with a 4x4 Stretched Canvas from Canvas Corp then stamped the JustRite Chevron Stripe Background onto the yellow paper from the FarmHouse Paper Company Sugar Hill 6x6 paper pad. Next, I cut a little banner (also using paper from the Sugar Hill 6x6 pad) and tied some twine around the top, finishing it off with a button. I stamped the title, Give Thanks, using the JustRite Autumn Words stamp set then cut it out using my Spellbinders Ribbon Banner die template. Using the new Spellbinders Fall Foliage die templates, I cut various leaves and pinecones from the Sugar Hill 6x6 paper pad, embossed, stenciled/inked them and added them to my canvas. Here's a closer look...
I really like how it turned out and think I will add it to my entry table this Fall. You still have a little time if you wish to participate in this week's challenge. Check out all the details HERE. Photobucket