Pages

Friday, December 23, 2011

Merry Christmas!!!

Hello friends, this is the last post for me before Christmas! I thought I would share an easy box that you could make quickly for any occasion!

This box came together really quickly! The front and back were created by simply cutting and embossing two Spellbinders Grand Big Scallop Circles. Then I cut and embossed a regular Spellbinders Grand Circle to fit inside the front panel. The box inside measures 4"x4"x4.25".

After scoring the box, I simply scored the scallop panels then glued them all together. I used elements from October Afternoon's Holiday Style collection to bring the box together. All edges were inked with Tim Holtz Frayed Burlap Distress Ink. Next, I added a black swirly bling from Want2Scrap and cut and embossed two Heartfelt Creations Spellbinders Holly leaves.

To finish it off, I added some white seam binding and mini jingle bells tied off with some red twine.

I am tucking an OU cup/mug and Starbuck's giftcard inside for my mother-in-law. I'd like to wish you all a very Merry Christmas! May you be surrounded by family and friends! God bless you all and don't forget the real reason for the season!

Photobucket

Monday, December 19, 2011

Did you see this???

Spellbinders has announced the 40 designers that will continue on to round 2 of their 2012 design team contest. Here's the excerpt from the Spellbinders blog...

Wow! What a first round it has been! The entries poured in from all over... not just the country... but from all over the world! The amount of talent that was showcased just blows our minds. We had all sorts of entries from cards, to scrapbook layouts, to mixed media projects. Each one of them was unique and truly showed the spirit of the person who created it. Thank you to everyone who participated in round one!

And now... to announce the 40 creative souls moving on to round 2! Congratulations to...

AJ Otto

Angela Fehr

Angela Ploegman

Ashley Harris

Astrid Maclean

Christine Emberson

Darsie Bruno

Debbie Seyer

Giovanna Smith

Heidi Van Laar

Iwona Palamountain

Jamie Cripps

Judy Hayes

Kalyn Kepner

Katarina Damm-Blomberg

Kathy Roney

Katie Piotrowski <--- that's ME!!!

Kendra Sand

Kim Nath

Kimberly Crawford

Latisha Yoast

Lesley Langdon

Linda Lucas

Lisa Fish

Marisa Job

Michelle Woerner

Monika Martinson

Sarah Mullanix

Shanna Vineyard

Stacy Rodriguez

Susie Bentz

Sylvia Blum

Teresa Horner

Terrance Doxie

Theresa Momber

Tina McDonald

Tonya Dirk

Trina McClune

Windy Robinson

Yvonne von de Grijp

The second round of submissions for these 40 people are due by 11:59pm CST on January 4th, 2012. Design submissions should be sent to designteam@spellbinders.us. The second round submissions will narrow it down to 20 people for the third round! We're very excited to see how this unfolds. Good luck to all second round participants!
I cannot even begin to tell you how exciting it is just to make it through the first round! I have about 100 ideas swirling in my head for my round 2 project! I appreciate everyone who has emailed me and left comments! I feel so blessed!

Photobucket

Friday, December 16, 2011

O Christmas Tree...

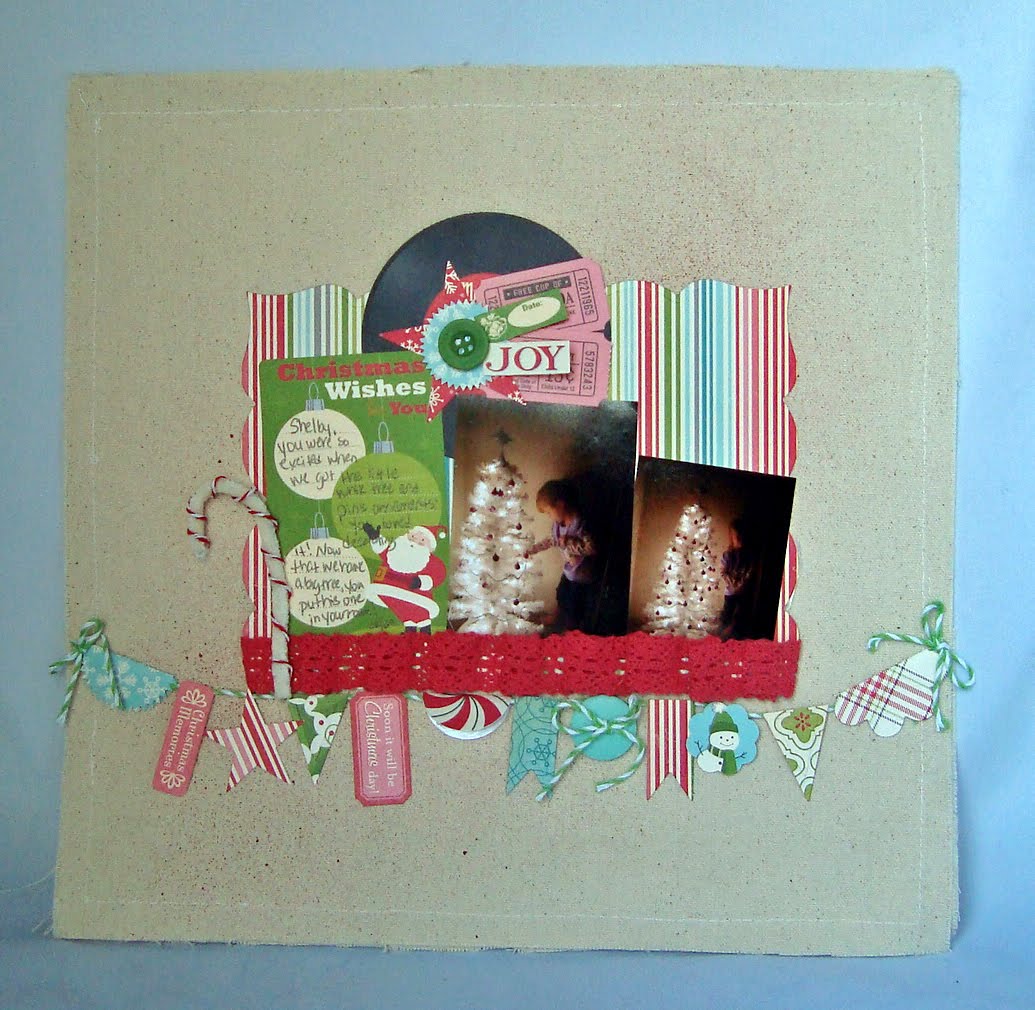
A few years ago I bought a white 4' pre-lit Christmas tree at a Black Friday sale for $12. I thought it was a pretty good deal. Then, I hit Hobby Lobby and purchased some mini tree pink ornaments, some silver bead garland, a star for the top and a tree skirt. Little did I know at the time that my daughter would think it was the BEST tree in the world!

Shelby spent hours entertaining herself decorating the tree. Now that we have purchased a 7.5' tree we have given Shelby the pink/white one for her bedroom. Talk about one happy little girl! ;) I created this layout with some pics I had taken of her the first time she decorated the tree...

I started out with a 12x12 Canvas Corp canvas fabric page. LOVE these pages! They are so fun to work with! Before adding anything to the page, I spritzed it a few times with some Peppermint Glimmer Mist. Since i still had plenty of the new October Afternoon Holiday Style collection, I decided to use it for my layout. I chose my pics and Journal Card then cut and embossed a mat with my Spellbinders Grand Calibur and Grand Labels Twenty-Three die template. Then I arranged my pieces and added the ribbon trim below them. The embellishment cluster above the photos was created with pieces from the Miscellany Pack, Flower Sack, Work Stickers and Label Stickers. Next, I decided to make a little candy cane by wrapping some twine around on of the pipe cleaners from the Miscellany Pack.

This layout was based on the 12x12 sketch in this post and I really wanted to keep the banner in the design. So, I took some of the twine and strung it across my page then started adding embellishments. I used pieces from the Flower Sack, Buttons, Word Stickers, Label Stickers and even die cut some of my pieces using my Spellbinders Nested Pennants die templates. Here's a close-up view of the banner...

I just LOVE how it all came together!

I hope you all have a wonderful weekend!

Photobucket

Thursday, December 15, 2011

Wednesday, December 14, 2011

Personalized Home Decor

Do you Pinterest? It is my newest addiction. ;) There's so much to see there...I can get lost there for hours. Lately, I've seen a lot of framed home decor projects and I decided to make one like I had seen on Pinterest before.

We are working, room by room, to personalize our home and make it ours. The foyer is our next project. We will be adding some family photos and I thought a monogrammed frame would be the perfect item to bring our photo collage together.

Glass etching may sound daunting but trust me, it really is easy! And your Gazelle does all, well almost all, of the work for you! I set my project size to the size of the glass insert for the frame, 8x10. Then, I chose my font and entered my text for the monogram and centered it where I wanted it. Then, I chose a second script font and entered the 'est.' and year and adjusted it's placement. Be sure you are using a vinyl blade when working with the vinyl. You don't want jagged edges or tears...especially when using it for glass etching. After changing out my blade, I loaded my vinyl on my mat and cut it out. So easy! It doesn't matter what color vinyl you choose because you're just using it as a tool this time. Scraps work great for this type of project. After cutting the vinyl, I had to "weed" out the parts I didn't need. In this case, I wanted the negative so I weeded out the actual letters. Here's what it looked like when I was done...

The next step is to get the vinyl onto my glass. The easiest way to accomplish this is to use transfer paper. When you're adhering the transfer paper to your vinyl, be sure you are burnishing it good all the way around so you don't have any bubbles or gaps. Then gently pull the transfer paper toward you, starting from the farthest corner, ensuring you're getting all the vinyl as you go. Here's what it should look like...

Now you're ready to apply the vinyl to the glass. Now, I cut my vinyl piece to 8x10 as well so I wouldn't have to worry about centering it on the glass. So I started by setting the vinyl along the very top edge of the glass, making sure my corners matched up perfectly. As I laid the vinyl, I burnished it as I went, like using a squeegee on your car windows then carefully removed the transfer paper, ensuring I didn't pick up any of the small pieces that fill my letters. I applied the Etch All Cream according to the directions on the bottle, waited about 15 or so minutes, rinsed and removed the vinyl. That's it!!

This would be a great project for a childs room, a perfect wedding gift or an easy accent for your own home decor!

Photobucket

Tuesday, December 13, 2011

Burnished Velvet Snowman Tag

I don't know about you but I LOVE glitter! A little sparkle on a project can make a big difference! Are you familiar with the Burnished Velvet technique? Terri with Boss Kut has done a series of videos that tell you what you'll need and just how to do it. You can view them HERE in Terri's YouTube channel.

Here's a fun little snowman tag I made for Boss Kut for the blog hop last week using this technique...

I chose to work with the new Melting Snowman Tag. After I opened the file in Funtime, I simply pulled the "arms" off (cause I wanted them as a layer, not cut as part of the design) and changed the line colors so the pieces could all be cut separately without disassembling the shape. I added my adhesive to my cardstock and loaded my mat. Be sure you do test cuts, as Terri suggests in the video. You don't want to wast a bunch of your adhesive, or time! I cut the inside pieces on Pressure 1 then cut the outside on the highest pressure. That was it!

So after I got it cut it was time to glitter! I used my paper piercer to "weed" the pieces...just like you would a garden, you remove the cover to expose the area you want to work on. I glittered one color at a time...the hat band, the nose then all my black pieces. After I applied each section of giltter, I pulled out my Copic to color the sections. Yes, you read that right! I colored the glitter with my Copics! The hat band was colored with R29, the nose YR18 and the rest with 100 Black. Super easy! Here's a pic of what the process looks like...

So fun! After I was done coloring, I cut the charm mat (included in the file) and the arms and finished assembling the tag. I added some Canvas Corp Cord to the top and tied it to a gift bag. Here's a closer view of the tag so you can see all the sparkle and shine...

Isn't he cute?! I had a lot of fun with this technique and will definitely be trying it again in the future!

Photobucket

Monday, December 12, 2011

Snow much Fun!!

Hello friends! I hope you all had a fabulous weekend! You know, last year in the Midwest we got slammed with TONS of snow! And I mean T.O.N.S.! The sketch I shared with you last week with the little snowman was just what I needed for some of the photos I took of my kids playing in the snow last year.

As you can see I followed the sketch all the way. I just really liked all the aspects of it. All items used on this layout are from the October Afternoon Holiday Style collection.

Thanks for stopping by today! I hope your Monday is the start of a fabulous week!

Photobucket