Wednesday, January 30, 2013
Spellbinders CHA Release...
Have you seen the Spellbinders 2013 CHA Winter release? All I can say is W.O.W. I seriously don't know how they do it year after year. This release, like all that have come before, is chock full of amazing and innovative dies. I was SUPER lucky to have received a big ole' box full of them last week and couldn't wait to work with them.
I was browsing through the January Page Maps and ran across a sketch I really liked so I used it as my inspiration for this layout.
The base for my layout is a piece of black American Crafts Cardstock. The green star paper is from a Dear Lizzy collection. I used the Page Maps Office Supplies dies to cut the little mats for my pictures. After adhering those, I decided to cut some little tags for the top using the new Page Maps Charmed I'm Sure set and tied them off just above the pics with some We R Memory Keepers Bakers Twine. For the title, I cut out a speech bubble from the new Page Maps Say What? die set then embossed it and stenciled the lines with my Silver Copic Spica glitter pen. For the words, I used the Donna Salazar Girlie Grunge Labels and followed the same steps as on the speech bubble. American Crafts Thickers finish off the title. Here's a closer view of the details...
It felt so good to be scrappin' again! It has been quite a while. :) This layout is headed to our trade show booth...coming to a show near you soon!

Monday, January 28, 2013
January Saturday Sketch #4 from Kaisercraft
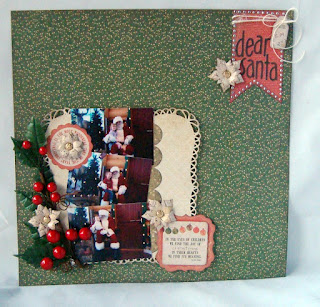
Have you ever started a layout or project, not too sure the exact direction, but ended up LOVING it when you were done? That is exactly what happened for me this this layout.
I was on Facebook the other day and my friend, Lori Williams, had shared Kaisercraft's link to the January Saturday Sketch. Soooo, I thought it would be fun to play along. Here's a peek at the sketch...
I went right to work digging through my Kaiser stash and stumbled upon the Merry & Bright collection. I had some pics of my littlest ones and my niece with Santa and thought it would be fun to work with them.
I started with a 12x12 sheet of Twinkling as my background page. I wanted to keep with the square layers so I grabbed my new Grand Decorative Labels One and cut it out using the cream side of a 12x12 sheet of Luminous. Once that was done I started picking out various die cuts from the 6 1/2" Merry & Bright paper pad. I really like how they add some embellishments in with the paper pads!! I LOVED the Twigs & Berries and knew right away it HAD to go on my page. I felt it needed a little something more and since I didn't have any Kaiser Christmas flowers, I decided to use one of the foil pages in the paper pack to cut some poinsettias with my Spellbinders Poinsettia Creations dies. Here's a close-up view of the Twigs & Berries...
Isn't that just gorgeous?! Lucky me, I have a small one left to add to a future project. ;)
After I got all the flower pieces cut and assembled I arranged all the elements then set to work on my title. I hand cut a banner piece from the paper pad then added some bling using some Kaisercraft Rhinestone Strips. The title was die cut using an old font and the wood grained paper from the pad. A little tag for the date tied up with some twine finished it off. Here's a closer look at some of the title details...
I love the added detail of the foil paper on the flowers. Like I said, I am extremely happy with how this layout turned out. Be sure to check out the Kaisercraft Blog for some amazing inspiration! And who knows, maybe I'll see you in one of the February challenges. :)

Friday, January 25, 2013
Anchored with Love
The Nautical theme has made it's comeback and is a hot new trend. With Valentine's Day just a few short weeks away, I figured I'd better get going with my cards. I decided to make hubby's card first.
I recently acquired the Quickutz Nautical Embossing Folder set and couldn't wait to use the anchor one. I started by creating a standard card base with kraft cardstock with a red mat on top. After embossing and adhering my white cardstock I began on my embellishments. First I cut the Scallop Heart and Heart using my Spellbinders Grand Calibur. Next, I stamped the sentiment, from the JustRite Stampers Anchor's Away stamp set and added the Silver Heart Nestabling then added the Quickutz Anchor. I thought it needed something more, but since it was a masculine card I was trying to avoid using ribbon. So I went with the Quickutz Rope Border from the Maritime release.
I think my favorite part is the embossing! Here's a closer look at the details...
Another Nautical favorite of mine is navy blue and white stripes with yellow color pop! I may have to do something with that soon!
I hope you all have a fabulous weekend! I'll see you Monday!

Subscribe to:
Posts (Atom)


