Good Monday morning everyone! Usually, I am not a Monday nor a morning person. But, I woke up early today, took a LONG hot shower and am now wide awake. ;) Drinking my coffee and going over my final list of to-do's and shopping before I head out this morning.
My husband constantly amazes me. He is kind, sweet, sincere, hard working, honest, loving...I could go on and on. Rocky is also a Jack-of-all-Trades. I have yet to see anything he cannot do. And, when he sets his mind to it he can really knock stuff out. I mentioned last week that he was working on our 2 car garage and that it would become my studio. I also mentioned that we anticipated 60-90 days before I could move in. Well, we were W.R.O.N.G. I moved in yesterday!!! Gasp! I know. Here's a picture of the mostly finished project before I moved in...
After moving everything out, we cleaned and repaired holes in the walls, painted then laid the epoxy floor coating. I was a bit skeptical about the epoxy floors but I really like how they turned out. Today, I'll get the trim and we'll get that up and hang my Making Memories Embellishment Center...that I bought like 4 years ago and never took out of the box. lol
Of course, after moving in it doesn't look like that now! I have to admit I had a bit more stuff than I realized. But, it will be organized soon. I ordered a large rolling kitchen island for my Big Shot Pro and am hoping it'll be here this week. And, in a few weeks we're going to Texas and I'll hit Ikea and grab one of the large Expedit shelving units. That'll do me for now.
Well, I'm off to do my duties for the day. I hope everyone has a fantastic Monday and thanks for letting me share my exciting news!
Monday, August 29, 2011
Friday, August 26, 2011
Happy Birthday LaLa Land Crafts...
Marci and Luka turned one and in celebration of their birthday, LaLa Land Crafts is hosting a blog hop with some fabulous blog candy...
This Blog Candy contains the following:
~ Set of 12 Copic Markers in NEW 2011 colors
~ Spica Glitter Pens (set B)
~ Pack of X-Press It Blending Cardstock
~ New Scor-pal
~ Pack of ¼” Scor-Tape
~ 3 sets of 12x12 Basic Grey Collections paper packs
~ $20 gift certificate to the La-La Land Crafts Store
What a prize package!!!
To be eligible for this FABULOUS blog prize, you must follow these 3 easy rules:
1. Become a follower and/or subscribe to our Blog.
2. Display a picture of our Blog Candy on your blog with a link back to THIS POST.
**if you don’t have a blog, please spread the word
3. Leave ONE comment on the LaLa Land Crafts blog post after completing the blog hop answering this question:
“Which stamp used on the projects in this hop is your favorite?”
You have until August 31st to leave your answer below in our comment section (one comment only please).
We will draw the winner’s name on September 3rd.
Have fun hopping and good luck to you!
Free digital collage personalized with Smilebox |
This Blog Candy contains the following:
~ Set of 12 Copic Markers in NEW 2011 colors
~ Spica Glitter Pens (set B)
~ Pack of X-Press It Blending Cardstock
~ New Scor-pal
~ Pack of ¼” Scor-Tape
~ 3 sets of 12x12 Basic Grey Collections paper packs
~ $20 gift certificate to the La-La Land Crafts Store
What a prize package!!!
To be eligible for this FABULOUS blog prize, you must follow these 3 easy rules:
1. Become a follower and/or subscribe to our Blog.
2. Display a picture of our Blog Candy on your blog with a link back to THIS POST.
**if you don’t have a blog, please spread the word
3. Leave ONE comment on the LaLa Land Crafts blog post after completing the blog hop answering this question:
“Which stamp used on the projects in this hop is your favorite?”
You have until August 31st to leave your answer below in our comment section (one comment only please).
We will draw the winner’s name on September 3rd.
Have fun hopping and good luck to you!
Thursday, August 25, 2011
Sugar n' Spice...
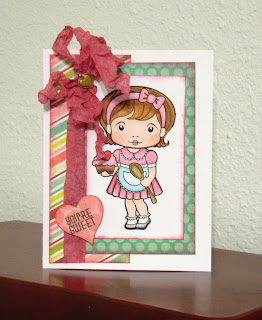
I needed a thank you card for a friend and I couln't resist pulling out my new Sugar n' Spice Marci. I just love the LaLa Land Crafts stamps! Take a peek...
I colored sweet little Marci with my Copic markers. Then, I added a few scraps of My Mind's Eye papers, another great deal from ScrapAce, to the card base, tied it off with some crinkled ribbon and added a little heart charm. For my sentiment, I pulled out my Gazelle and used the text feature to write the "you're sweet" by simply removing my blade and adding a Copic Spica Glitter pen. I replaced the blade then cut the heart shape out around my text. The heart was adhered with some American Crafts dimensional adhesive and that was that. I added a touch of sparkle throughout the card with my clear Copic Spica Glitter pen.
Be sure to stop by tomorrow to find out how you can win some amazing blog candy from LaLa Land Crafts!!
Wednesday, August 24, 2011
Back to school...
My kids went back to school a few weeks ago, August 10th actually. Can you believe it is time for school already again?! My mom was here visiting and once again I tried my hand at sewing. Something about my mom makes me want to sew. hahaha I have seen the cute Pillow Case dresses on Etsy and figured I could probably make something like that. So, I did. Here's a picture of Shelby in her new dress for her first day of Kindergarten...
I didn't have a pattern, but I did use one of her other dresses to help me get the armholes right. This was my first time working with bias tape and I was a little nervous but I am extremely happy with how the dress turned out. And Shelby loves having new clothes and it was even better that mommy made it for her. I made her a little hairbow to match her dress and even dolled up some $1 flip flops. I have purchased some more fabric and plan on making her a t-shirt dress soon!
Tuesday, August 23, 2011
changes are a comin'....
My very own, personal and dedicated craft space has been in my sights for a LONG time. Really long time. My husband is very supportive of my crafting and is as happy as I am that I have found gainful employment in a field that I love. Rocky has made every effort to help me get my own space and has decided to make the ultimate sacrifice....he's giving me our 2 car garage!!! Yes, you read that correctly. Our garage is detached and has a heat/air unit already in it. It is insulated and other than the overhead door, you won't be able to tell it's a garage.
The decision was made just this past Friday and as you can see by the picture below, he's well on his way to getting things out and cleaned up.
By the end of this week we'll be mudding and texturing the walls and hopefully painting next weekend if not earlier. The double doors in the back are going to be painted with chalkboard paint and will serve as my calendars for class schedules and creative deadlines. LOVE IT! I know it is probably hard for you to envision now but just wait. ;)
The best part is that I will now have room to teach and host crops at HOME!! I had numerous ladies ask me this past weekend at the convention if I taught Copic classes...thankfully I was able to get their info then and tell them they're coming soon. While I will get to move into my new space in less than 60 days, I will not "open" for classes and such 'til after the first of the year. I have picked out some delicious furniture from Ikea and will blow my tax return fixin' the place up. HA!
And, with the new craft space will come a new blog but that is still in the works. Thanks for letting me share my exciting news with you! I am craftin' the day away today and will have new projects to share later this week. In the mean time, stop by tomorrow to see my latest sewing adventure.
Wednesday, August 10, 2011
big, Big, BIG brother...
Our daughter is the youngest of four kids and the ONLY girl. So, you can imagine she is one tough little cookie. She has three great, big brothers who not only look out for her but also take their turns torturing her. hahaha But seriously, the boys are really great brothers. I snapped a photo of Shelby sitting on Brian's lap at the zoo and since I don't have many pics of the boys with Shelby individually I couldn't wait to scrap this one.
The paper strip I used for the center was just the right amount of pattern. After adhering it to my kraft background, I stuck my photo where I wanted it. The title was cut with my Slice and the Just Chillin' Teen design card and the Fonts: Essentials design card. The letters for big were cut at 1.5, 2.5 and 3.5 and brother was cut at 1.5. For my smaller letters, I used my Model 150 Xyron sticker maker. If you have issues with extra adhesive around your letters when you remove them from the film, try using your Rub-on tool to burnish around each letter first. Works like a charm. I ran some twine through some October Afternoon Campfire buttons and added them to the title. My journaling is hidden by using the old trick of tucking it behind the photo. The ribbon was misted with some Strawberry Shortcake Glimmer Mist from ScrapAce (perfect match for the Campfire Buttons!) and topped off with another button.
I am definitely lovin' the 8.5 x 11 size and will keep them coming, for now. ;)
Tuesday, August 9, 2011
Easel Card...
I have seen some amazing Easel Cards out in blogland but have yet to try making one myself, until now. As soon as I saw the new Grand Labels Twenty Three dies I knew they would look great on the front of a card. And I thought, why not try to make an Easel Card? Here's my creation...
I had to change up the sizes in the instructions to make it fit with the front I chose but I made it work. I cut, embossed and inked my Grand Labels Twenty Three and layers of Grand Rectangles then assembled the easel. After cutting the Fancy Tags Two shape, I stamped the sentiment from the JustRite Kindness cling set and added the Fancy Tags Two Nestabling. My favorite part of this card is the Spiral Blossom. I cut one from white and one from pink cardstock and made mine a bit larger. Since this card is going inside a package I wasn't worried about bulk. ;) After getting my flower together, I cut two leaves from the Foliage set and inked and tucked them under my Spiral Blossom. A bit of crinkled ribbon and some pins finish off the front. To hold the card open I cut a Scallop Petite Border and added some individual blings.
The Spellbinders CHA Summer release was A.M.A.Z.I.N.G.!!! I don't know how they do what they do...over and over again...but I'm glad they do. :) If you haven't seen them or pre-ordered your favorites yet you can check them out HERE. We are expecting them to arrive toward the end of August so get 'em while you can!
Monday, August 8, 2011
Try it on for size...
Hi everyone! I hope you are having a great summer. I know I am. I have been traveling a lot for work...lots of stamp and scrapbook shows! Thankfully my family has had the opportunity to tag along with me once or twice so we've had a few mini vacations in there.
One of the things I love about papercrafting is trying something new. I started scrapbooking a little over 11 years ago and from day one I always scrapped 12x12 layouts. I am guessing it is because the person who showed me how to scrapbook showed me in 12x12 size. So, recently I decided to try something new...8.5 x 11. I was a little skeptical because I am usually one of those people who likes things even on my pages...almost symmetrical. But, I tried it nonetheless and here's my very first layout...
Now, since I am new to this size I checked out some sketches before I settled in to create. I found this one from Page Maps and decided to give it a try...
You can see that I used some elements of the sketch, but still put my own spin on it. I started out by cutting my black American Crafts cardstock down to 8.5x11. Next I cut and adhered the little patterned paper squares and placed my photo. Using my Spellbinders Nesting Pennants, I created the little banner on the top right corner, with little rhinestones placed between each banner piece. Scrap-Mart's Exclusive Clouds mixed with some stickers from the paper pack finished off the top of my layout. I added a flourish bling from Want2Scrap and created some felt flowers with the Lifestyle Crafts Roses die. I cut the smaller rose from light and dark pink felt and instead of rolling them up, I just kind of folded them around, adhering as I went, 'til it was flat and formed into a flower then I tucked an American Crafts brad in the center. Next I added two Lifestyle Crafts leaves that I cut from Core'dinations cardstock. I added the title under my photo to finish the layout off. The little alpha stickers were in my paper pack and the 'girl' was cut using my Slice and the Words & Expressions Family design card. One more Cloud and a little sticker added to the bottom and that was it.
I really enjoyed working with this size and I have a few more to share with you. Tomorrow, however, I'll be back to share a card I made with some of the new Spellbinders released at CHA Summer.
Subscribe to:
Posts (Atom)