Pages

Friday, September 23, 2011

Flower Soft Challenge...Circles

Ah, it is officially Fall now and that makes me soooo happy!!! Fall is my FAVORITE season! And I am having so much fun creating some Halloween projects, which is so much easier with the help of my Gazelle. I made this fun Halloween Wreath for our front door...

To start, I used the circle function in Funtime and simply drew a large circle and a small circle and positioned them to create the wreath. Then I cut 2 layers of thin chipboard with my deep cut blade and one layer from patterned paper then adhered them all together. I cut some rosettes using my Big Shot Pro and the new Rosettes die. For the challenge, I added Flower Soft to the rosette centers and sprinkled a bit of irridescent glitter over them. For the white rosette center, I wanted to add a bit of color so after my glue dried, I airbrushed it with a Copic Marker then topped it off with a large rhinestone. To further embellish the wreath, I added the Ghost Pumpkin and Bat then enlarged the Boo to fill in the center of the wreath. I removed the center from the second 'o' and replaced it with the *new* Witch file. I used some Silver and Purple glitter paper to add a little zing to the letters and topped the wreath off with a raffia bow.

Now my front door is ready for some little trick-or-treaters!

Photobucket

Thursday, September 22, 2011

Stampin' Up! order...YOU could win my hostess benefits!!!!

Hello all!! I have a dear friend who MUST place a qualifying order next week to stay active. She's been with SU! for quite some time and really doesn't want to quit. I want to help her, as she has been GREAT to me!!! So, I am hosting a "catalog" party and giving away my hostess benefits to ONE lucky winner who places an order for my show!!

Here's how it will work. ALL orders will receive NO TAX!!! Shipping (to me) is FREE!!!! If you live close, I will deliver it to you. If not, I can stuff quite a bit in a Priority Envelope for $5! For every $10 you spend, I will put your name in the hat. IF the party total reaches or exceeds the $150 minimum for hostess benefits, I will draw ONE name from that hat and that person will win my hostess benefits!!! You MUST have your order to me by 2 pm on Tuesday, September 27th!!!  You can pay via PayPal, credit card or check!  Just let me know and I'll get you the info you need.  IF you are the hostess winner you will have to have your order to me by Wednesday, so keep in mind what you may want!!

Visit HERE to view the current catalog online.  And feel free to email me at sethdsmom@yahoo.com if you have any questions!
Photobucket

Wednesday, September 21, 2011

10 Minute Halloween Card...

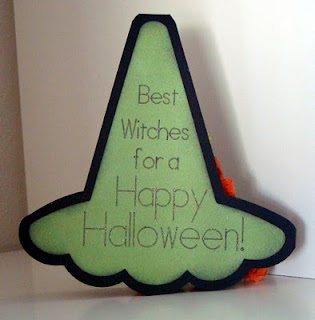
I know we are still in September but Halloween is fast approaching! And, with work and kids and extra curricular activities we're all super busy these days. With the help of your Gazelle, handmade cards CAN be fast and easy and still look great! Check out this 10 minute card I made....

To create the cardbase, I took the *new* Witch Hat file and resized it to my liking, created a blackout shadow then mirrored the blackout. **You must mirror it so that the brim of the hat lines up properly. Next I simply turned the mirrored hat upside down, lined up the tips and welded them together. I cut the cardbase from black cardstock then cut out the layer from the patterened paper. I chose to cut the brim layer from Purple Glitter Paper to give it a little extra umph. You can cut multiple pieces at one time by placing the different papers all on your one mat OR, if you have multiple mats you can prepare each one with a different paper and cut by color. The later is my personal favorite. Here's what all my pieces looked like after they were cut...

After each one was inked I adhered them together, adding dimensional dots under the glittery brim. I tied it off with some delicious crinkled ribbon and added some pins that coordinated with my papers. It still looked a little bare to me so I decided to add the cute little spider from the *new* Spiderweb. And, of course, he HAD to have googly eyes!!

To finish off the card, I used my Gazelle to type the sentiment and "printed" it by simply replacing my cutting blade with a Copic Spica Glitter Pen. Before "printing' I made sure my words would fit inside the layer of the hat then after replacing my blade, I cut it out and used that to line the inside.

See how easy it is to make fast but cute cards?? Give it a try, I just know you'll love it!

Photobucket

Tuesday, September 20, 2011

JustRite Friday Challenge 057: Frugal Friday, Sponsored by Spellbinders!

This week's JustRite challenge is to create an inexpensive/frugal gift idea (anything but a card) using something recycled or reused from around your home. I have been collecting new Spellbinders dies and still had the original packaging laying around so I thought I'd do something with them. My oldest niece just had her first baby and I tought I would make a little brag book with the packaging for her. And after seeing the JustRite/Spellbinders/Want2Scrap blog hop last week I was totally inspired!!

I started out by trimming my Spellbinders packaging to 6 1/2".

The inside of the packaging measures about 4.25" x 6" so the Simple Stories 6x6 Baby Steps paper pad was perfect for this project. After choosing my paper and elements for the front cover, I cut out the top banner using the Spellbinders Ribbon Banners then stamped the title with my JustRite Just Because Mini Sentiments set. I added some Silver Heart Nestabling then cut out the Spellbinders Pennants and stamped the baby's name using my JustRite Brayton Font.

The paper pad had a little tag where you could add the baby's birth info so I used my JustRite Brayton Font and stamped the info onto the tag. A few embellies and some ribbon finished this page off. For the next page, I die cut a medium and a small Spellbinders Scallop Heart then topped them both off with some Silver Scallop Heart Nestabling. I stamped the sentiment from the JustRite 1 5/8" Loving Thoughts Set then cut it out with my Spellbinders Circle Nestabilities and added it to the center of the smaller heart.

The Baby Steps mini pad also had great little numbered tags for each month. The 1 was already there but I thought I'd personalize it by adding his name and the word month with my JustRite Brayton Font. This page was easily finished off with a little border strip from the paper pad. On the next page, I layered some papers then added the little ticket. I stamped the sentiment using a border from my JustRite 2 3/8" Stitched with Love set then created a frame with it by cutting it out with my Spellbinders Circle Nestabilities. A little bling added the finishing touch to my frame.

For his 2 month page, I stamped his info again with the Brayton Font then layered the tag onto some baby blue cardstock and tied it off with some We R Memory Keepers Twine and topped it off with a button. A border across the top was all this page needed. For the next page, I simply added a border strip I trimmed and topped it with a mini bingo card.

Here I used the negative piece from a previous page to create the top border, added the 3 month tag stamped and personalized with my Brayton Font and a bit of bling. The next page, I used another mini bingo card and a small label. Some Silver Heart Nestabling and Pink Labels One Nestabling jazz it up a bit.

And finally my last page. Here I added a little tag then stamped the star border from my JustRite 1 5/8" Just a Note set. I cut the star border into a frame with my Spellbinders Circle Nestabilities then used the inside to stamp the sentiment on. The sentiment is from the Kindness Cling set.

After tucking all the pages inside the packaging I pulled out my Cinch and went to town punching the holes. After binding it I tied the wired off with some ribbons and that was that. The wires will be easy enough to pull apart so Kristian can add her pics and pinch 'em closed again. Now she has a little brag book she can keep in the diaper bag and not worry about the pictures and papers getting messed up! LOVE it!

Thanks for stopping by! Be sure to visit the JustRite blog to see all the projects for this week's challenge and stop by Friday to see what the next challenge is!

Photobucket

Letterpressed Birthday Card

I have to admit that the Letterpress was not high on my list of wants when it was first introduced. I figured it was more work and mess than what it was worth. But, I was wrong!!! Lifestyle Crafts recently sent me a Letterpress Starter kit and I pulled it out and made this card with it...

I used the flower template that came with the starter set and Hot Pink Ink to create my custom background and when it dried I simply added rhinestones to the flower centers and randomly placed some around the flowers. Next, I stamped the sentiment, cut it out with the Nesting Squares then adhered it to the new 2x2 Tag. I wanted to create some layers for this card so I took a piece of white cardstock and inked all over the edges with my Letterpress Ink. That way, my background papers perfectly matched my inked images. I added a wide piece of black ribbon and used my pink We R Memory Keepers twine to tie the sentiment to the ribbon. I really love how this card turned out.

I am definitely happy with the Letterpress. The clean up is easy with the cloths and it does NOT make a mess like one might think. I brought home a Christmas plate set and will be sending Letterpressed Christmas cards to family this year.

Photobucket

Sunday, September 18, 2011

Welcome home...

We have a dear family friend who was removed from her family by the state a few years ago. She has special needs and the family was abusing her. It broke our hearts to see the physical abuse she endured and while we were saddened when she was put into a group home, we know it was a far better place for her to live. Rachelle is capable of taking care of herself and actually helps take care of some of the other residents in the group home. She has a big heart and loves to help others. When she was removed from her family, Rocky became her court appointed advocate so we've been continually involved in her life. Rocky works hand in hand with her DHS case worker as well as her case worker at the group home. Since Rachelle's capable of taking care of herself and she's so highly functioning, Rocky worked together with her case workers to get her moved into her very own home. She still lives in the care community but lives in her OWN home instead of the group home. We went to visit her just after she moved in and I thought it'd be nice to give her a handmade card.

Today's my day on the Scrap-Mart Blog. I didn't share all the personal details there but you can find a list of the products used in my post there today.

Photobucket

Saturday, September 10, 2011

Zebra print...

I know I mentioned to you earlier this week that I LOVE Zebra print. Well, I have a friend who does too and her birthday is coming up. I bought the Sizzix Zebra embossing folder last year at the San Marcos convention and just now used it!! Um, yeah.

Today's my day on the Scrap-Mart blog. All products and details are listed there.

Thanks for stopping by!

Photobucket

Wednesday, September 7, 2011

So excited...

Hi everyone!! I hope you're all having a great week! I know sometimes it can be rough getting back into routine after a long weekend. Last week I read on the Lifestyle Crafts Blog that they were having a contest. All you had to do was submit a link to a project you had created recently using their dies. That was easy!! ha! I submitted this layout...

I was soooo excited to find out that I was one of four winners who will be receiving a $200 prize package!!! Woohoo!!! And, I'd like to thank my friend and fellow Scrap-Mart dt member, Karen, for letting me know I'd won! That's not the first time Karen's had to inform me of such a thing. LOL! I'm excited to see what they send me!

Thanks for letting me share my excitement with you. You can see the announcement post HERE and check out the other winning projects. And, if you'd like the details on my layout you can find them in the original layout postHERE.

Photobucket

Tuesday, September 6, 2011

Happy Birthday.....to me.....

Hello friends! I hope you all had a fantastic, long holiday weekend. I know I did. Yesterday was my birthday so I very much enjoyed having everyone home and getting to spend that extra day with them. My bff Stacey came over yesterday with her hubby and their niece and nephew and we grilled hot dogs and hamburgers. It was a GORGEOUS day here and my day couldn't have been any better. The garage conversion was part of my birthday present. I know, right?! Pretty BIG gift. I have the best hubby E.V.E.R.!!!

I have a Big Shot Pro die cut machine and this machine is BIG, just like it says in the name. I have really wanted a designated die cutting area for some time now and with my new space, I was able to make it a reality! I searched and researched all kinds of rolling carts and utility carts and found this one on Overstock.com...

The top is 51" wide and 18" deep but will expand to 29" with the leaf. It is perfect for my Pro and leaves me ample space on the right. Right now, I have my Grand Caliber there but it can easily be moved to make room for my Slice or my Presto Punch. ;) Here's a side view...

There are two drawers just under the top and I have my Spellbinders cutting pads in the right and all other cutting pads on the left. Then, in the cabinet below I have my Cinch and wires, Slice, Cuttlebug and Presto (on the right) and my Pro dies and Sew Easy case and mat as well as my embossing folders (on the left). When I get my Expedit shelves I will probably move my Pro dies to it but they are fine for now.

And, if that wasn't enough b-day fun, Stacey bought me this for my studio...

In case you didn't know, I have a thing for Zebra print!! lol! I LOVE it and it's just perfect!

Thanks for stoppin' by and letting me share my birthday fun! Believe it or not I am busy, busy making projects!! But, most of them are dt projects so they won't be shown quite yet. I promise to share something crafty very soon! ;) Have a great Mon-Tuesday!

Photobucket

Friday, September 2, 2011

A new layout...

Hello friends! I am slowly getting settled into my new space and LOVING it! I actually had a chance to create yesterday! It felt sooooo good! Here's the layout I made...

Today is my day on the Scrap-Mart blog and I've listed all the details of my layout there.

Thanks for stopping by!

Photobucket